Good Practices for Zoom Teaching
Below are some good practices for the different roles to observe when preparing, hosting/learning and after a Zoom class is conducted. Click on each role to learn more, you may be able to find some answers to your questions there:
FAQs for Zoom Teaching
Below are some frequently asked questions for Zoom teaching- Click the categories below to jump to the relevant section.
Pedagogical Advice Technical Issues Policy/Administration Polling Breakout Rooms Whiteboard
- Click on each of the questions below to expand for more details.
-
You may also search using 'keywords' for better results. If your keyword is found, search results will show in the question and answer.
Type in keywords, e.g.: share screen, annotation, or pre-assign - If you can’t find the answers to your questions, you can submit your questions through this Qualtrics form. The questions will be channelled to the relevant parties and be updated here when ready.
Pedagogical Advice
A3: There are multiple ways to enhance interaction online. Students can
- make written comments using the messaging feature, e.g. Group chat
- request for sharing verbally with everyone in the class
- be assigned to breakout rooms for peer discussion
- share their computer screens and present their work to everyone in the class
View Tips and Tricks to Engage students View Sample Live Online Teaching Lesson Plan
A4: You may consider putting up a greeting screen, which includes class announcements, a clock, and a music background. By doing so, students can ensure they join the right class at the proper time. Not only can they read the class announcements before the class, but students can also test their network connections and the position of the webcams before the class starts.
You can obtain the greeting screen at: https://itscapps.ust.hk/zoom/waitingroom/ (credit: Prof. Pedro Sander of CSE). Load up the page in a browser, type in the announcements and share the browser screen in Zoom. Please note the announcement text only resides on the local browser, when the browser window is closed, the text is gone.
Alternatively, you may use the PowerPoint slide templates created by CEI: For Win | For Mac
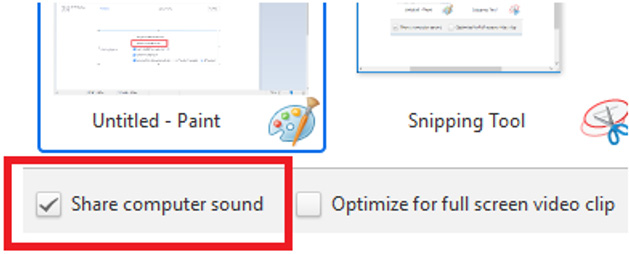
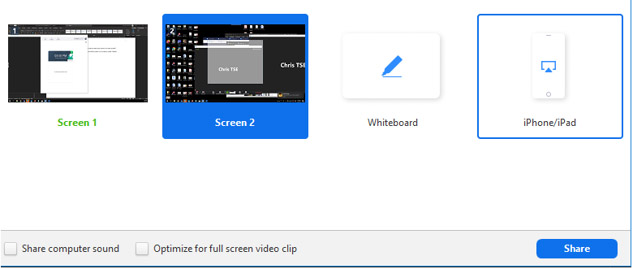
Note: To play background music in the greeting screen, you should make sure that "Share computer sound" is enabled when sharing the screen in Zoom.
A5: The THREE suggested strategies to facilitate online group activities and enhance student engagement:
1 | Carefully plan and design group activities before class 2 | Proactively facilitate group activities during class 3 | Include peer evaluation to incentivize student engagement throughout the semester
1 | Carefully plan and design group activities before class
We recommend (a) assigning dynamic group roles and (b) designing a clear activity structure when planning group activities
a) Assign Dynamic Group Roles:
Assigning students with group roles can reduce slacking, make all members more active and accountable instead of just the group leader. It can also increase the quality and focus of the discussion, and allow students to improve communication with each role.
Suggested strategies when adopting Dynamic Group Roles:
- Introduce the group roles at the beginning of the semester
- Be transparent about why you are assigning group roles to increase student buy-in
- Provide students with list of roles and brief descriptions for each role (Refer to the role cards)
- Assign roles randomly and rotate roles in each session to help students develop communication skills in each role 2
- Reinforce roles throughout the semester and by monitoring discussions
- Acknowledge exemplar role behaviors and share them with the class.
“I noticed Kit was an effective facilitator. He helped redirect his group back to the question when the discussion went off track.”
- Acknowledge exemplar role behaviors and share them with the class.
b) Design a clear activity structure:
We also recommend instructors to carefully design the srundown of the group activity. Some important aspects of a group activity that instructors should consider:
- Questions to discuss
- Steps to kick-start the activity
- Duration of the activity
- Expected output from student groups
- Do students know the rationale for the activity?
- What is the expected outcome/product from the activity? (Short write-up or slide?)
- How will you give students instructions for the activity?
- Give students a Word doc or PPT Slide with the following (See sample)
- Is there a scaffold, structure and clear instructions for the activity?
- What are the suggested group sizes? (In an online environment, we suggest 3-5 students per group to encourage participation, more effective communication and decrease changes of free-riding)
- Group roles may be modified or combined based on the group size
- Does the structure give students time to process the new information before they are asked to respond?
- Does the activity include adequate time for student groups to present ideas to the class?
- How are you going to evaluate students’ output from the activity?
- What are the main takeaways from the activity?
2 | Proactively facilitate group activities during class
- Provide clear instructions to students prior to the group activity. Give a copy of the instructions to students and walk them through
- Assign each student a group role
Proactively facilitate student groups during the activity
- Provide feedback or coaching to groups during the activity
- Keep up with the groups’ progress regularly to ensure the activity does not overrun
See facilitating group activity sample from Mixed Mode Seminar
Involve students by allowing groups to share their work with the class after the activity
- Invite student groups to share the outcomes in form of write-up or slideshow
- Debrief group responses vs the main takeaways you wanted students to get from the activity
3 | Include peer evaluation to incentivize student engagement throughout the semester
- Conduct peer evaluation mid-semester and end of semester using iPeer
- Review peer results of individual students' performance
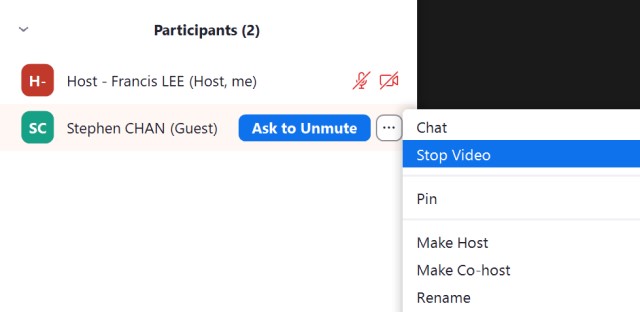
A8: Yes. Click Participants in the host controls to open the Participants panel. Hover over a participant and click More > Stop Video.
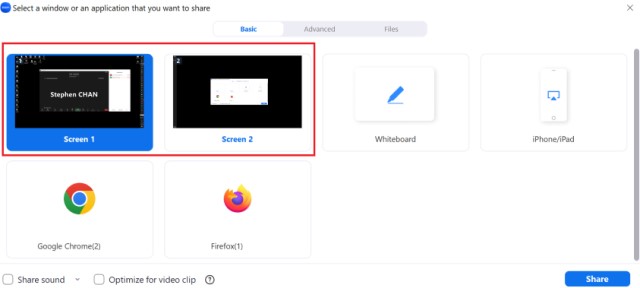
A9: You should share your desktop (or Screen 1 or 2 for PC with dual monitors) instead of selecting an application. Your students can see you switching among applications on your desktop smoothly.
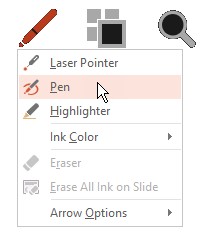
A10: We suggest doing the annotation on slides using the built-in annotation feature of PowerPoint. The annotation will be saved and disappeared when you move to the next slide. Refer to Draw on slides during a presentation
A11: Yes, while students viewing a shared screen, ask them to click on View Options and choose Side-by-side mode. The shared screen will appear on the left and the speaker will appear on the right. Hover the pointer over the boundary between the shared screen and the participants' video to adjust the portion.


A12: You may consider using a separate computer and join in your class with a project account (as a participant or as a co-host). You can use the "Gallery View" on this computer to show up to 49 students (25 students for a computer with less processing power) and flip the pages to see other students while teaching on your main computer.
You can apply for the ITSO project account here (https://itso.hkust.edu.hk/services/general-it-services/user-account/staff/project-account) and it should be ready within a day after the application.
A13: Two recommendations as follow:
Solution 1
Use another device for joining the class as a participant and keep the Participant Panel on the screen at all times.
Solution 2
Set up dual monitors with your computer. Share screen with one screen and put the Zoom window on the other screen with Gallery view launched. Refer to https://support.zoom.us/hc/en-us/articles/201362583-Using-Dual-Monitors-with-the-Zoom-Desktop-Client
A14: Two recommendations as follow:
Solution 1
You should use your laptop to start the meeting as a host, then use your iPad to join the meeting. For the iPad, you can either (1) log in with your ITSO account concurrently, or (2) log in with an ITSO project account. You can apply for the ITSO project account here (https://itso.hkust.edu.hk/services/general-it-services/user-account/staff/project-account) and it should be ready within a day after the application.
With the iPad being assigned as the co-host, you can use the iPad as the whiteboard. While you are teaching, you will be switching screens between your PC and iPad. You should ensure only one device is unmuted at a time, or everyone in the meeting will get terrible audio feedback.
Solution 2
Connect your iPad to the laptop/PC with a lightning cable, and use screen mirroring. Use your laptop to start the meeting and share the screen of your iPad. On your iPad, use the app "Notes" as the whiteboard. Refer to the instruction: https://support.zoom.us/hc/en-us/articles/201379235-iOS-Screen-Sharing-with-the-Zoom-Desktop-Client.
For both recommendations, we suggest using iPad Pro with Apple Pen to get the accuracy and smoothness for teaching, especially for mathematics, chemical formulae etc.
A16: We suggest two approaches to handling the Group Chat if you do not have a teaching support staff to manage it for you:
Approach 1
Instead of responding to the students' inquiries on the spot, the instructor can review the chat messages in the cloud recording and reply to them afterwards. So before the class starts, inform the students to send non-urgent inquiries to "Everyone publicly" (this way the inquiries can be recorded) and tell them that the inquiries will be addressed by the instructor after the Zoom class.
Approach 2
Instructors can turn off the group chat function if the group chat is not needed. Instructors may ask students to raise their hands and ask verbally during the Zoom class.

A17: Yes, you can provide the following resources to your students before they join your class:
Student Guide - Getting prepared for your Online Classes with ZOOM by ITSO
Suggested settings for students' accounts in Zoom by CEI
Good practice for students by CEI
Zoom starter guide for students by ARO
Technical Issues
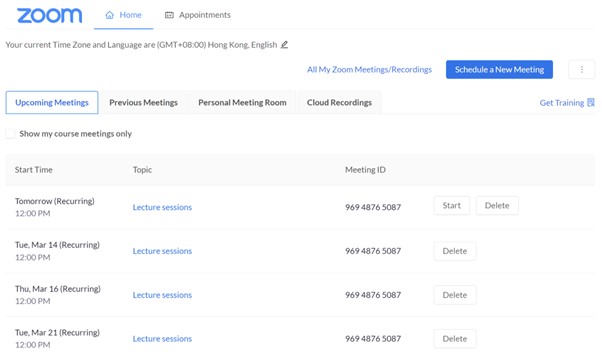
A2: Instructors can create multiple Zoom meetings using "Recurring meetings". Since the meeting settings and the meeting ID of the recurring meetings are the same, we recommend instructors use "Recurring meeting" to set up multiple Zoom meetings for their classes.
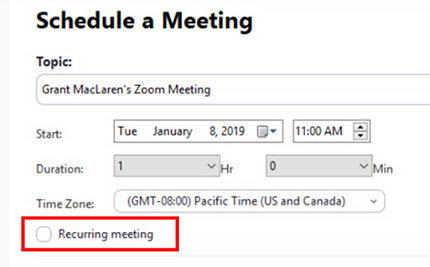
A4: You should create two recurring meetings. One recurring meeting for Mondays, and one for Fridays, there will be two meeting IDs. Students will log in to the Canvas course site > "Zoom Meeting" tab and join the Zoom meeting.
A5: Yes, you can start the meeting before the scheduled time. Indeed, you are highly recommended to start the meeting earlier to test your equipment and connection.
However, you should not allow students to join before you. In the meeting option, uncheck "Enable join before host".

A6: We recommend you to schedule the meetings through Canvas, and further adjust extra options in https://hkust.zoom.us. If you schedule the
90Zoom meetings by other means, you are recommended to import the meetings in Canvas.

Students will log in to the Canvas course site > "Zoom Meeting" tab and join the Zoom meeting.
A9: It is not possible to allow only "enrolled students" to join the Zoom classes. However, you can restrict the Zoom class to only students who log in using their ITSO accounts (i.e., @connect.ust.hk/@ust.hk). Please do the following:
- Login to https://hkust.zoom.us with your ITSO account via SSO. Toggle "Only authenticated users can join meetings" under "Settings"
- "Meeting Authentication Options" will appear when you toggle "Only authenticated users can join meetings". Set "HKUST" as default and hide the option "Sign in to Zoom". If you do not hide this option, anyone who registers a free account using a personal email can still join your Zoom meetings.
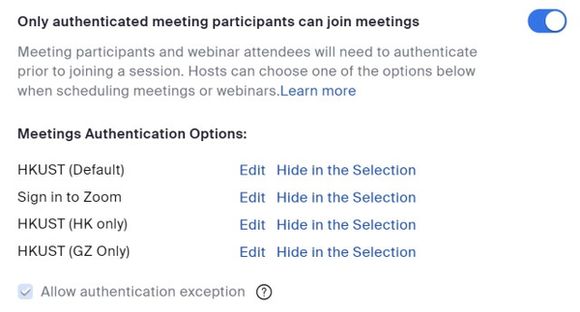
- Go to "Meetings", either schedule a new meeting, or click on one of the meetings that you already scheduled and select "Edit this Meeting". You can press "All" to edit for all recurring meetings.
- Under Security, select either “Require authentication to join”, or “Only authenticated users can join meetings” if scheduling through Canvas. Select “HKUST” which will limit access to all HKUST users only. Or select "HKUST (HK only)" for Clear Water Bay account access only or "HKUST (GZ only)" for GZ account access only.
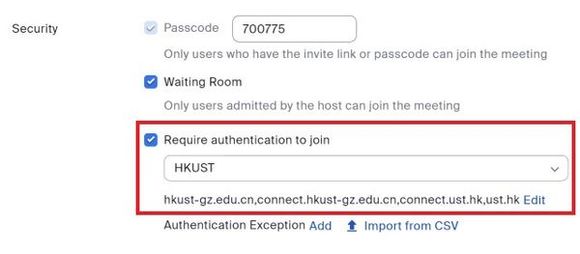
Please note that, if "Only authenticated users can join" is disabled, the Zoom meeting reports will not include any participants' official emails and names but just their display name in the meeting session.
A10: For students who join the Zoom meeting with their ITSO credentials, their full names and ITSO email addresses will be captured in the attendance reports. Instructors/TAs can download the report under "Zoom Meeting" in the Canvas course sites. Even though some students may have renamed themselves during the Zoom meeting, the attendee report can still track their ITSO accounts. However, if the Zoom classes are not configured as "Only authenticated users can join", some students may join the classes without their ITSO credentials, and then there is no way for the instructors to identify these students from the attendance record.
A12: Zoom requires a passcode for scheduled Zoom classes starting from Aug 27, 2020, onwards, students are required to either (1) enter the passcode or (2) use the passcode embedded link to join the Zoom class. Students who join the Zoom class via Canvas are not affected, as they join using the passcode-embedded links via the "Zoom Meetings" module in Canvas. However, for students who join the Zoom class by Meeting ID without getting through "Zoom Meeting" module in Canvas, instructors should check the passcode in "Zoom Meeting" module in Canvas, and pass it to them.
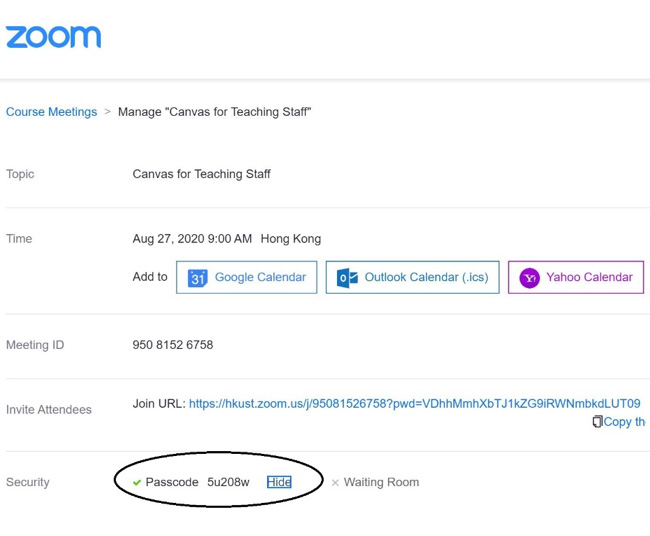
A13: You can go to Zoom Global Settings at https://hkust.zoom.us Log in with your HKUST ITSO account and click the 'Settings' Tab to toggle the list of features on and off.
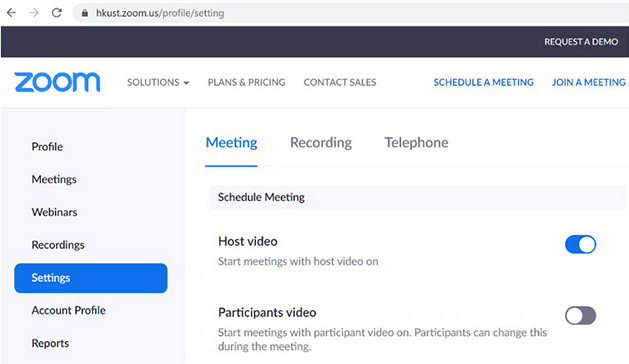
A14: Students' webcams will be turned on if you set Participant's video as "On" when you schedule a Zoom meeting. You can also enable this setting for the Zoom meetings scheduled. Students' webcams will be turned on once they get into the Zoom meeting. However, you may still not see all students' videos, as students can turn the webcam off anytime during the meeting. It is also possible that some students do not have a webcam installed on their computers.

A15: The Zoom account privilege of RPG students is the same as full-time staff. Your TAs can verify their user type at https://hkust.zoom.us. The user type should be shown as "Licensed".
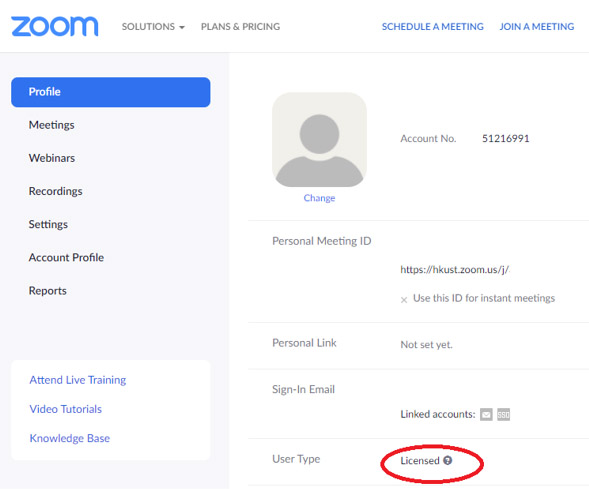
If the user type is shown as "Basic" with an upgrade option, they should use the account to start a new meeting. After hosting the first meeting, the ITSO authentication will recognize if students are RPG and link their sign-in to Zoom Pro automatically. Contact cchelp@ust.hk if you encounter any difficulties.
A16: Instructors and TAs can schedule Zoom meetings on the course site, so it is technically feasible for TAs to schedule meetings for the instructor. If the Instructor would like the TA to schedule or edit parameters on the instructor's behalf, "Schedule Privilege" should be set up in hkust.zoom.us "Settings". Please note, although this will allow the TA to schedule for the instructor, it will also mean the TA will own the reports for that meeting they scheduled. In addition, the TA will also be able to access and edit ALL HKUST Zoom Meetings (and Polls) for that instructor until their "privilege" is removed.

A17: Students who cannot access Zoom through Canvas can join the Zoom class directly by entering the meeting ID and passcode. You can find the meeting ID and passcode when you are scheduling a new meeting.
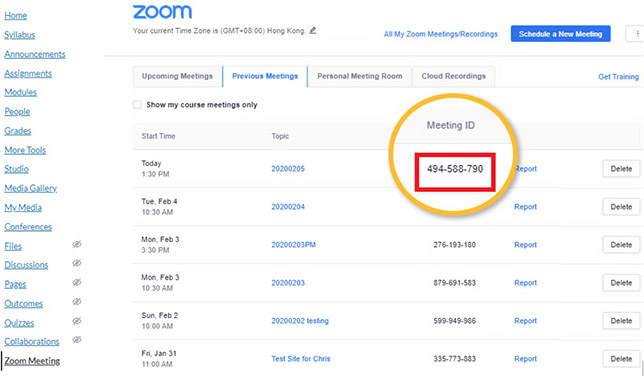
For the students who cannot access Zoom through Canvas, they should first download the Zoom client via https://zoom.us/download/.
Students can join the Zoom class by entering the meeting ID and passcode.
A20: No, you can only see the messages that are sent publicly or sent to you privately. To prevent students from chatting privately, you may consider turning off the private chat.
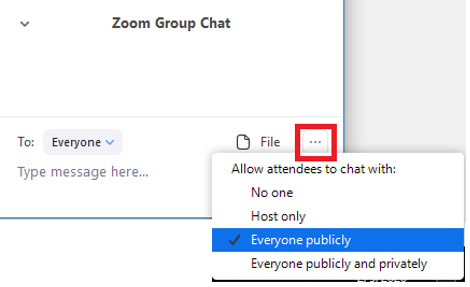
A21: You should remind the student to check "Share computer sound" when he selects an application with audio to share.
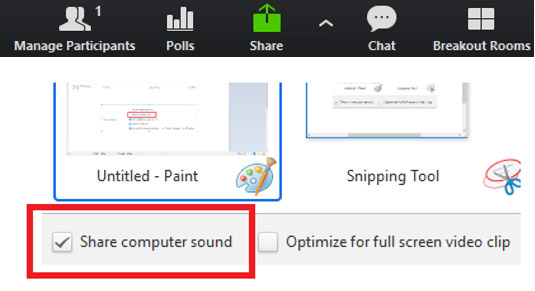
A22: Yes, you can play and share a video on your PC using screen share. You may also consider embedding video clips into the PowerPoint slide. When you share the screen, be sure you checked "Share computer sound".
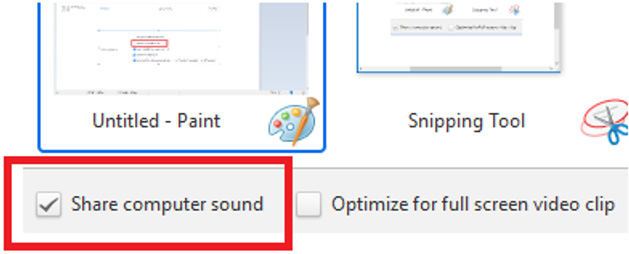
A23: No, the participants (including the instructor) can only select one shared screen at a time, and switch to another shared screen by selecting under "View Options".

A24: Yes, if you have dual monitors set up, you can select the screen to share (Screen 1 or Screen 2) under "Share".
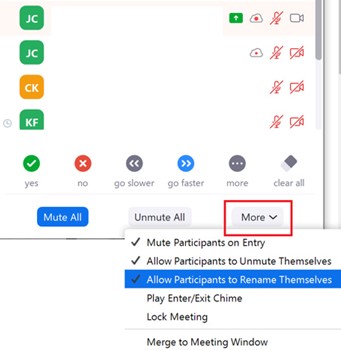
A26: As long as they sign in with their ITSO for the Zoom meeting, their identities (i.e. email) will be shown in the participation report, regardless of how many times students change their names. Alternatively, you can uncheck "Allow Participants to Rename Themselves" during the Zoom Meeting.
A30: Yes, if you stop the recording, this will break the recordings. To keep the recording in one video, instead of "Stop Recording", you should click "Pause Recording" during the break and resume the recording afterwards.

A31: If you scheduled the Zoom meetings via Canvas or imported the Zoom meetings into Canvas, you can find the recording under the "Zoom Meeting" > "Cloud Recordings" tab in Canvas. To publish the recordings to students, simply toggle "Publish" to on. Students can review your published recording under the same tab in Canvas.
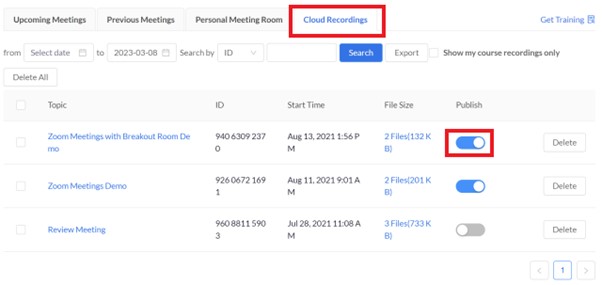
A33: You might have deleted one or a few recordings of the recurring meetings under "Zoom Meeting" in Canvas which breaks the linkage between Canvas and the corresponding recurring meetings. To restore the linkage, you should recover the "deleted" recordings of the recurring Zoom meetings by logging in to https://hkust.zoom.us. Go to "My Recording" > "Trash", you should be able to see all the recordings that you previously "deleted" via Canvas. Simply click on "Recover" next to the recordings and it will show up again in Canvas.
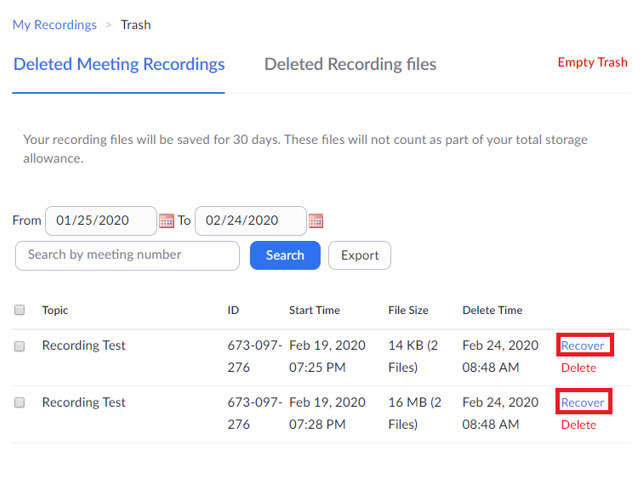
For recordings that you do not want to release to students via Canvas, you are recommended to keep them as "Unpublish", instead of deleting them.

Policy/Administration Related
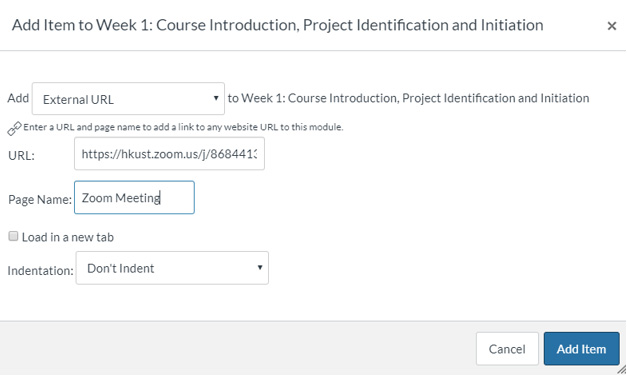
A2: One meeting ID can only be listed under one Canvas course site. You cannot import the same Zoom ID to other Canvas course sites twice. However, you can obtain the links to the Zoom classes and post the links to other Canvas courses that share the same meeting.
- In the "Zoom Meeting" of the Canvas course site, select a meeting.

- Copy the "Join URL:” with the embedded passcode.
Note: The Join URL will be the same for all recurring meetings.
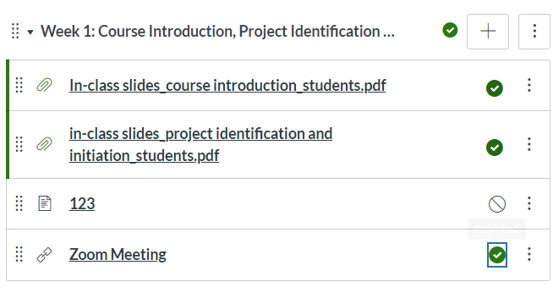
- Add the link into Canvas under "Modules" as an "External URL" item.
- Publish the item to students.
A3: Starting in Fall 2020, all cloud recordings of the Zoom classes will be retained on the cloud until 1 month after the semester ends. They will be removed automatically from the cloud afterwards. To back up the recordings for future courses, you should download them to your local drive - refer to the instructions here. If you want to retain the recordings of continuing courses which span across two or more semesters, please make arrangements with ITSO by providing them with the corresponding course codes. Email: cchelp@ust.hk.
Polling Related
A1: There are two polling types in Zoom, 1) Polls and 2) Advanced Polls and Quizzing
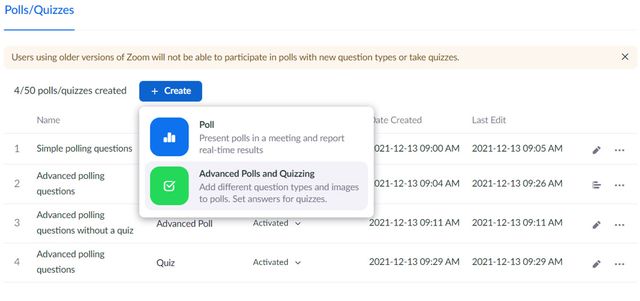
- "Polls" supports MCQs with a single answer or multiple answers and does not support assigning correct answers.
- "Advanced Polls and Quizzing" supports additional question types including:
- MCQ with a single answer
- MCQ with multiple answers
- Matching
- Rank Order
- Short and Long Answer
- Fill in the blank
- Rating Scale
Except for the Short and Long Answer and Rating Scale, instructors can set correct answers for other question types by configuring the poll as a quiz.
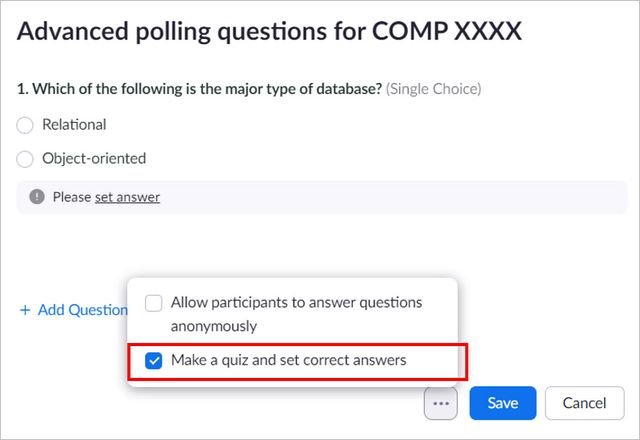
Instructors can show the correct answer to participants when the poll ends.
The Advanced Polls and Quizzing require Zoom version 5.8.3 or above for both instructors and students.
To enable the "Advanced Poll and Quizzing" option, instructors should enable "Allow host to create advanced polls and quizzes" in https://hkust.zoom.us -> Settings -> In Meeting (Basic)
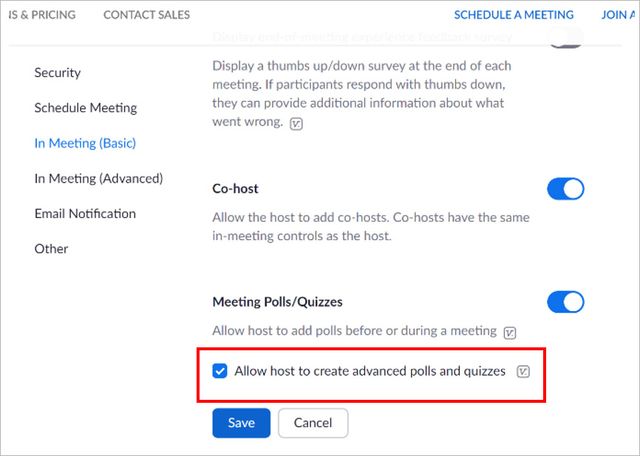
Please visit https://support.zoom.us/hc/en-us/articles/4412325214477-Advanced-polling-and-quizzing-for-meetings to learn more about the Advanced Polling and Quizzing.
You can create up to 50 polls in a Zoom class while you can create up to 50 questions in each poll.
A4: As polling questions can only be preset by the host beforehand, the instructor should preset the polling questions given the instructor is the host of the Zoom class. For the procedure of presetting polling questions, refer to Q5.
However, you can have your TA manage the polling during the Zoom class, by assigning your TA as the co-host during the meeting, your TA can help launch/relaunch the polling and share the polling result with participants.
In addition, you can also grant your TA more functions to manage the polling by designating your TA as the alternative host and allowing alternative hosts to add or edit polls.
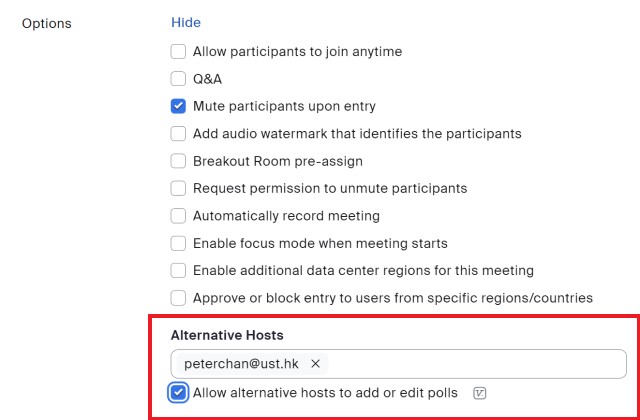
As long as your TA’s role is either a host or co-host in the Zoom class, your TA can also add/edit the polls on the fly and download the polling report right after each poll.
A5: Go to https://hkust.zoom.us and schedule a new meeting first. After the meeting is scheduled, click on the meeting title.
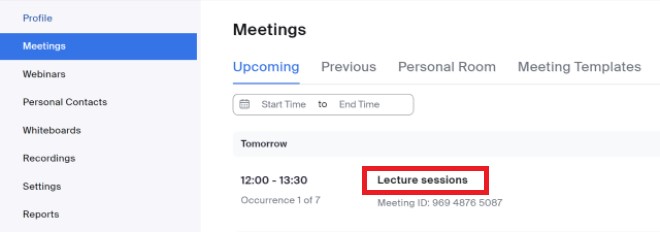
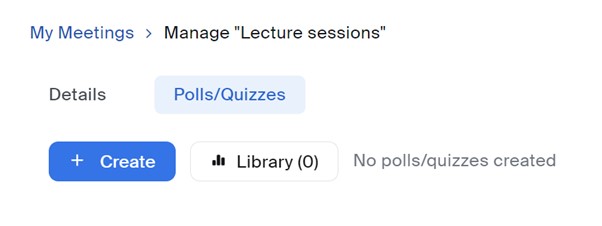
Click “Polls/Quizzes”, click “+Create” and start to create polls.
A7: Yes, you can see the number of students who submitted the answer and the response rate during the polling. You can always click “View Result” again after the poll is ended but it will only keep the result of the last attempt.
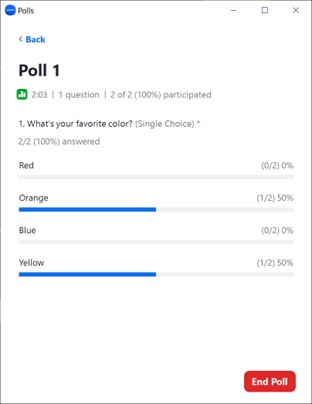
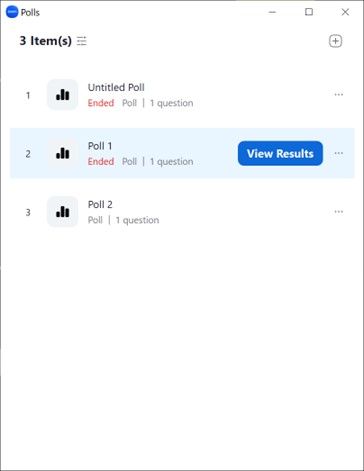
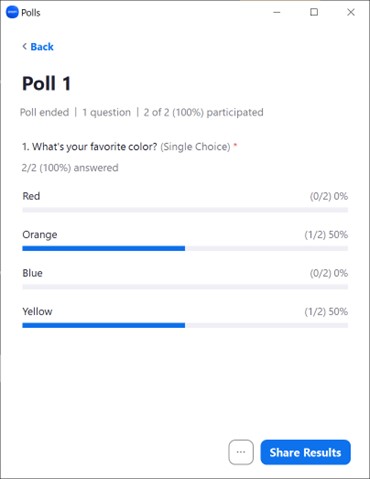
A8: Yes, the host can share the poll results again anytime during the Zoom class. Launch the Poll window by clicking Polls on the menu, clicking “View Results” and click “Share Results” to share the result.
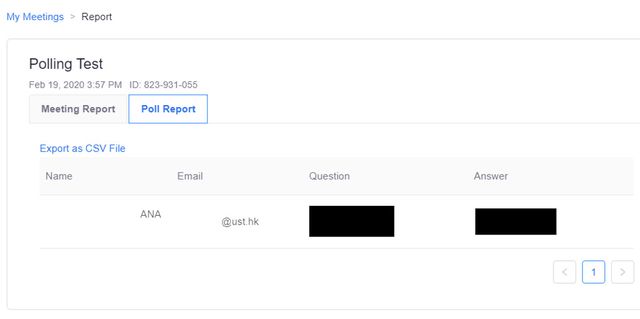
A14: If the instructor schedules the Zoom meetings via Canvas, the instructor can obtain the Poll report under "Zoom Meeting" -> "Previous Meetings" -> "Report"
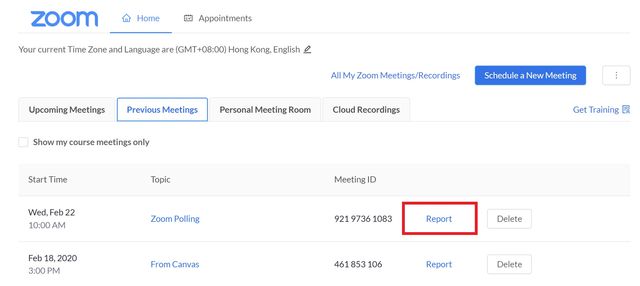
Select the "Poll Report" tab.
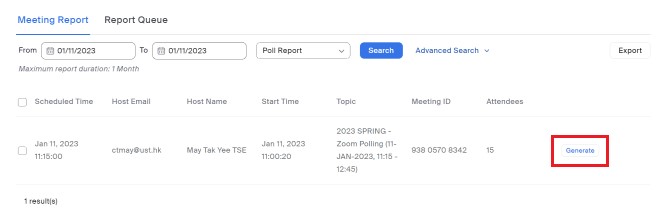
If you did not schedule your Zoom Meeting via Canvas, or you did not import the meeting under "Zoom Meeting" in Canvas, the host should generate the Poll Report via https://hkust.zoom.us > Reports > Meeting
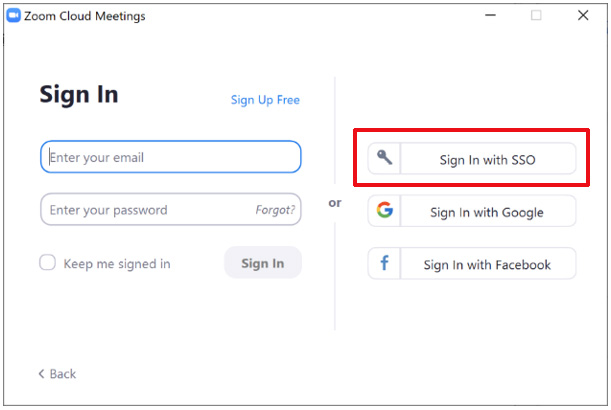
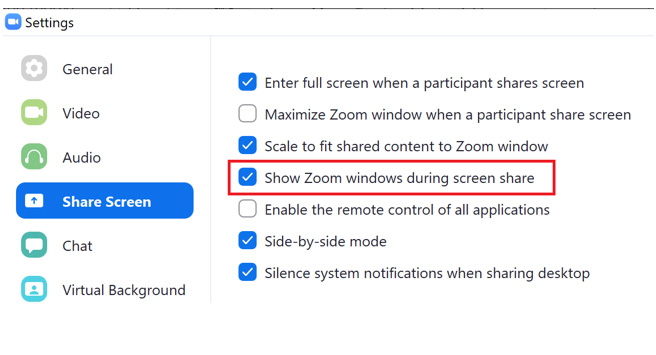
A20: Before starting the Zoom class, open the Zoom application in your computer, select "Sign In with SSO".
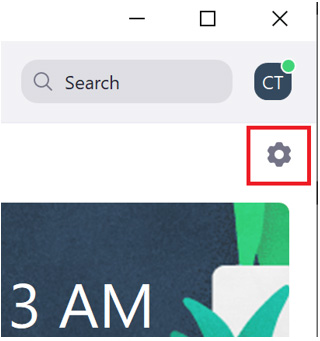
After logging in, click on "Settings".
Check "Show Zoom windows during screen share" under "Share Screen".
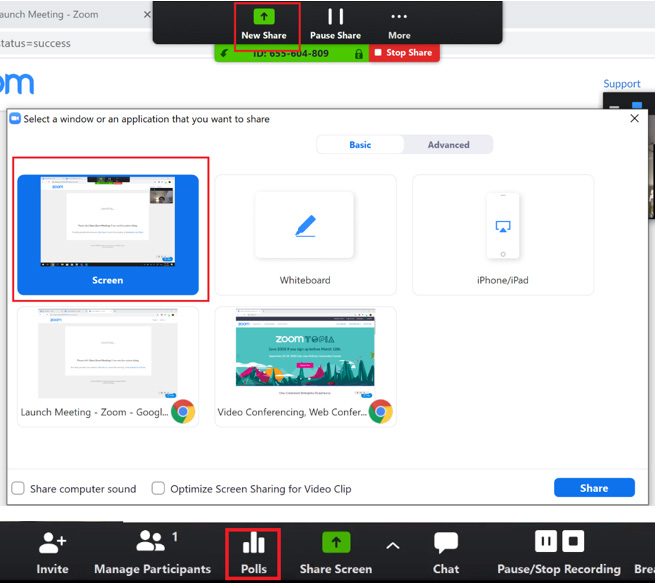
In the meeting, select "New Share" while sharing the screen, or select "Share Screen", if you have not shared any screen yet, and choose "Screen" before launching a poll.
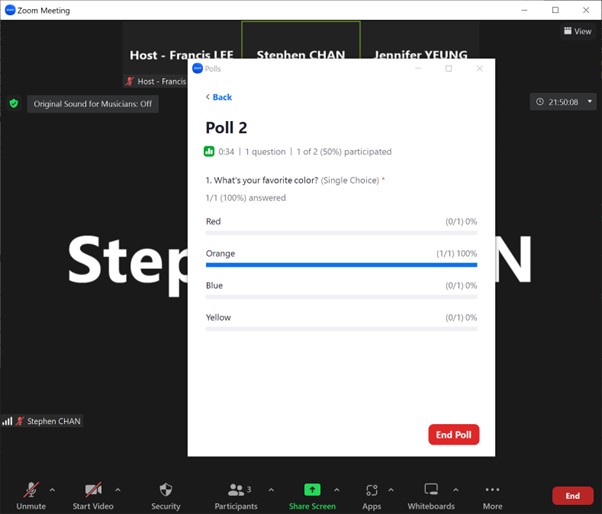
The process of launching the poll, receiving students’ responses, and displaying the result of the poll will be recorded in the recording.
Breakout Rooms Related

A2: If the instructor is going to be the host of the Zoom meeting, he should create and pre-assign breakout rooms when scheduling a Zoom meeting as only the owner of the meeting can do so.
The instructor can download the template in CSV from Zoom and ask the TA to pre-assign students into breakout rooms using that template. The instructor can then import the completed template at the meeting setting page.
Refer to https://support.zoom.us/hc/en-us/articles/360032752671-Pre-assigning-Participants-to-Breakout-Rooms
The template can be imported into different meetings (i.e., different meeting IDs). To help pre-assign the breakout rooms, your TA may export the class list from Canvas and work from it.
A4: Before the breakout activity, you should have the TA assigned as the co-host. Then they will have full permission at helping with the breakout activities, including setting up rooms, launching and ending rooms and jumping around rooms. When setting up rooms, you have the option to include or exclude the co-hosts from assigning to the breakout rooms.
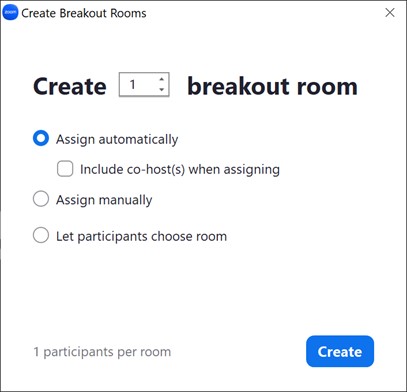
A9: Students can only move from room to room if the option "Let participants choose room" is selected when create rooms. During the meeting, the host selects "Breakout Rooms", and selects "Let participants choose room". Students can see a list of breakout rooms created and join a breakout room accordingly. Otherwise, students cannot move from room to room on their own, the host needs to re-assign a student to another breakout rooms manually.
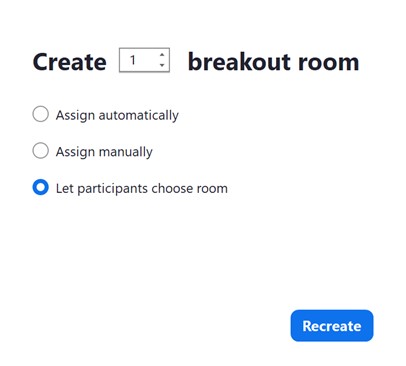
A11: If your students do not have a fixed group assigned, you can assign students to breakout rooms randomly during the meeting.
For students assigned with fixed groups, you can let students to self-select a breakout room during the meeting instead.
During the meeting, the host selects "Breakout Rooms" and selects "Let participants choose room". Students can see a list of breakout rooms created, and each student can join a breakout room accordingly. Refer to "Self-selecting a breakout room" under https://support.zoom.us/hc/en-us/articles/115005769646 for details.
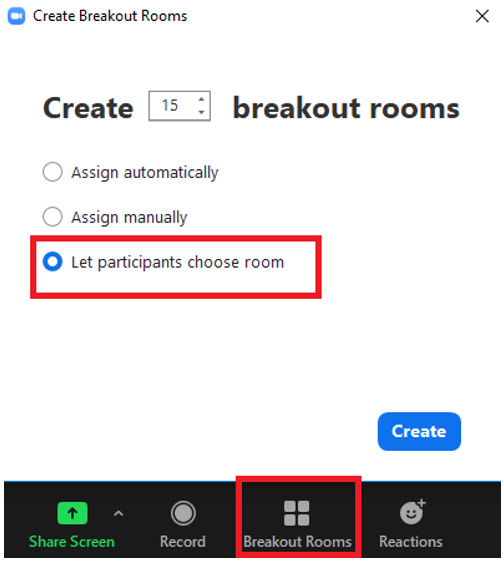
As students can enter, leave and re-join any breakout rooms with this feature enabled, your students should form groups beforehand, such that they join their corresponding breakout rooms in the meeting.
A14: Yes, students can leave the breakout room anytime if they are allowed. If not they will be leaving the meeting.
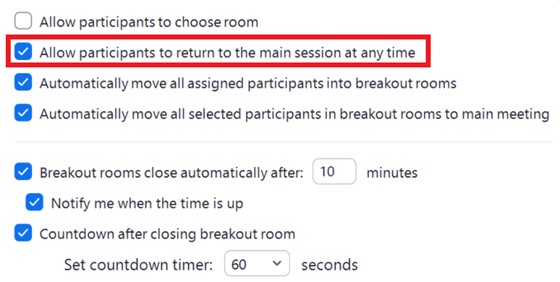
If students are allowed to return to the main room, they can rejoin the assigned breakout rooms.
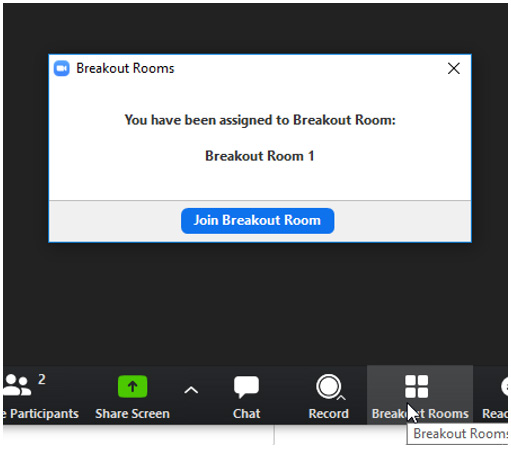
A17: Two recommendations as follow:
Option 1:
Students can request the host's assistance by clicking "Ask for help", the host will be alerted and join in the breakout room to provide support. Since students cannot notify the co-host for help, the co-host is recommended to check students' progress room by room. The host may also ask the co-host to go into a particular room to assist when he receives the alert.
Option 2:
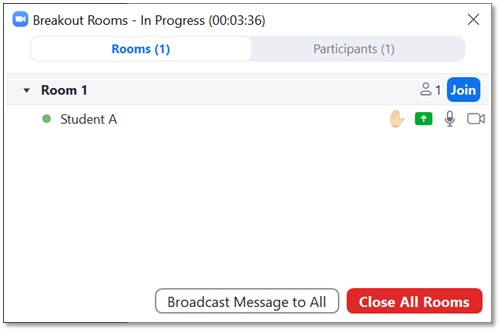
If the Breakout Room option “Allow the host to view activity statuses of participants in breakout rooms (e.g. share screen, reactions)” is enabled, you can ask students to raise their hand in the room, so the host or co-host can know which room is needing help.
Whiteboard Related
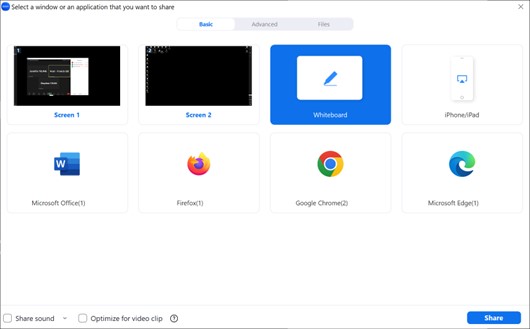
A1: The Whiteboard feature allows the host to write or draw on the screen, it also allows participants to anno tate together on the same screen if allowed. The whiteboard feature is enabled by default, click "Share Screen" and select "Whiteboard" during the Zoom meeting to enable the Whiteboard.
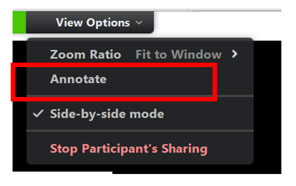
A3: Students can select "View Options" and select "Annotate" to start annotating on your Whiteboard if allowed.
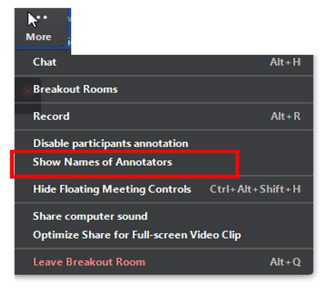
A4: Yes, you can select "Show Names of Annotators" to see which annotations belong to who.
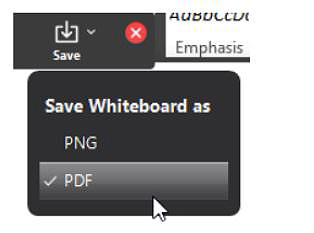
A7: Yes. Instructor can save his own Whiteboard. The format is in PNG format.

A10: Yes, you can create up to 20 pages of Whiteboard. Select ">" or "<" at the bottom-right corner of the Whiteboard to switch between pages during the Zoom class.
When you save the Whiteboard, the pages can either be saved as individual image in PNG format or combined as a single PDF.
