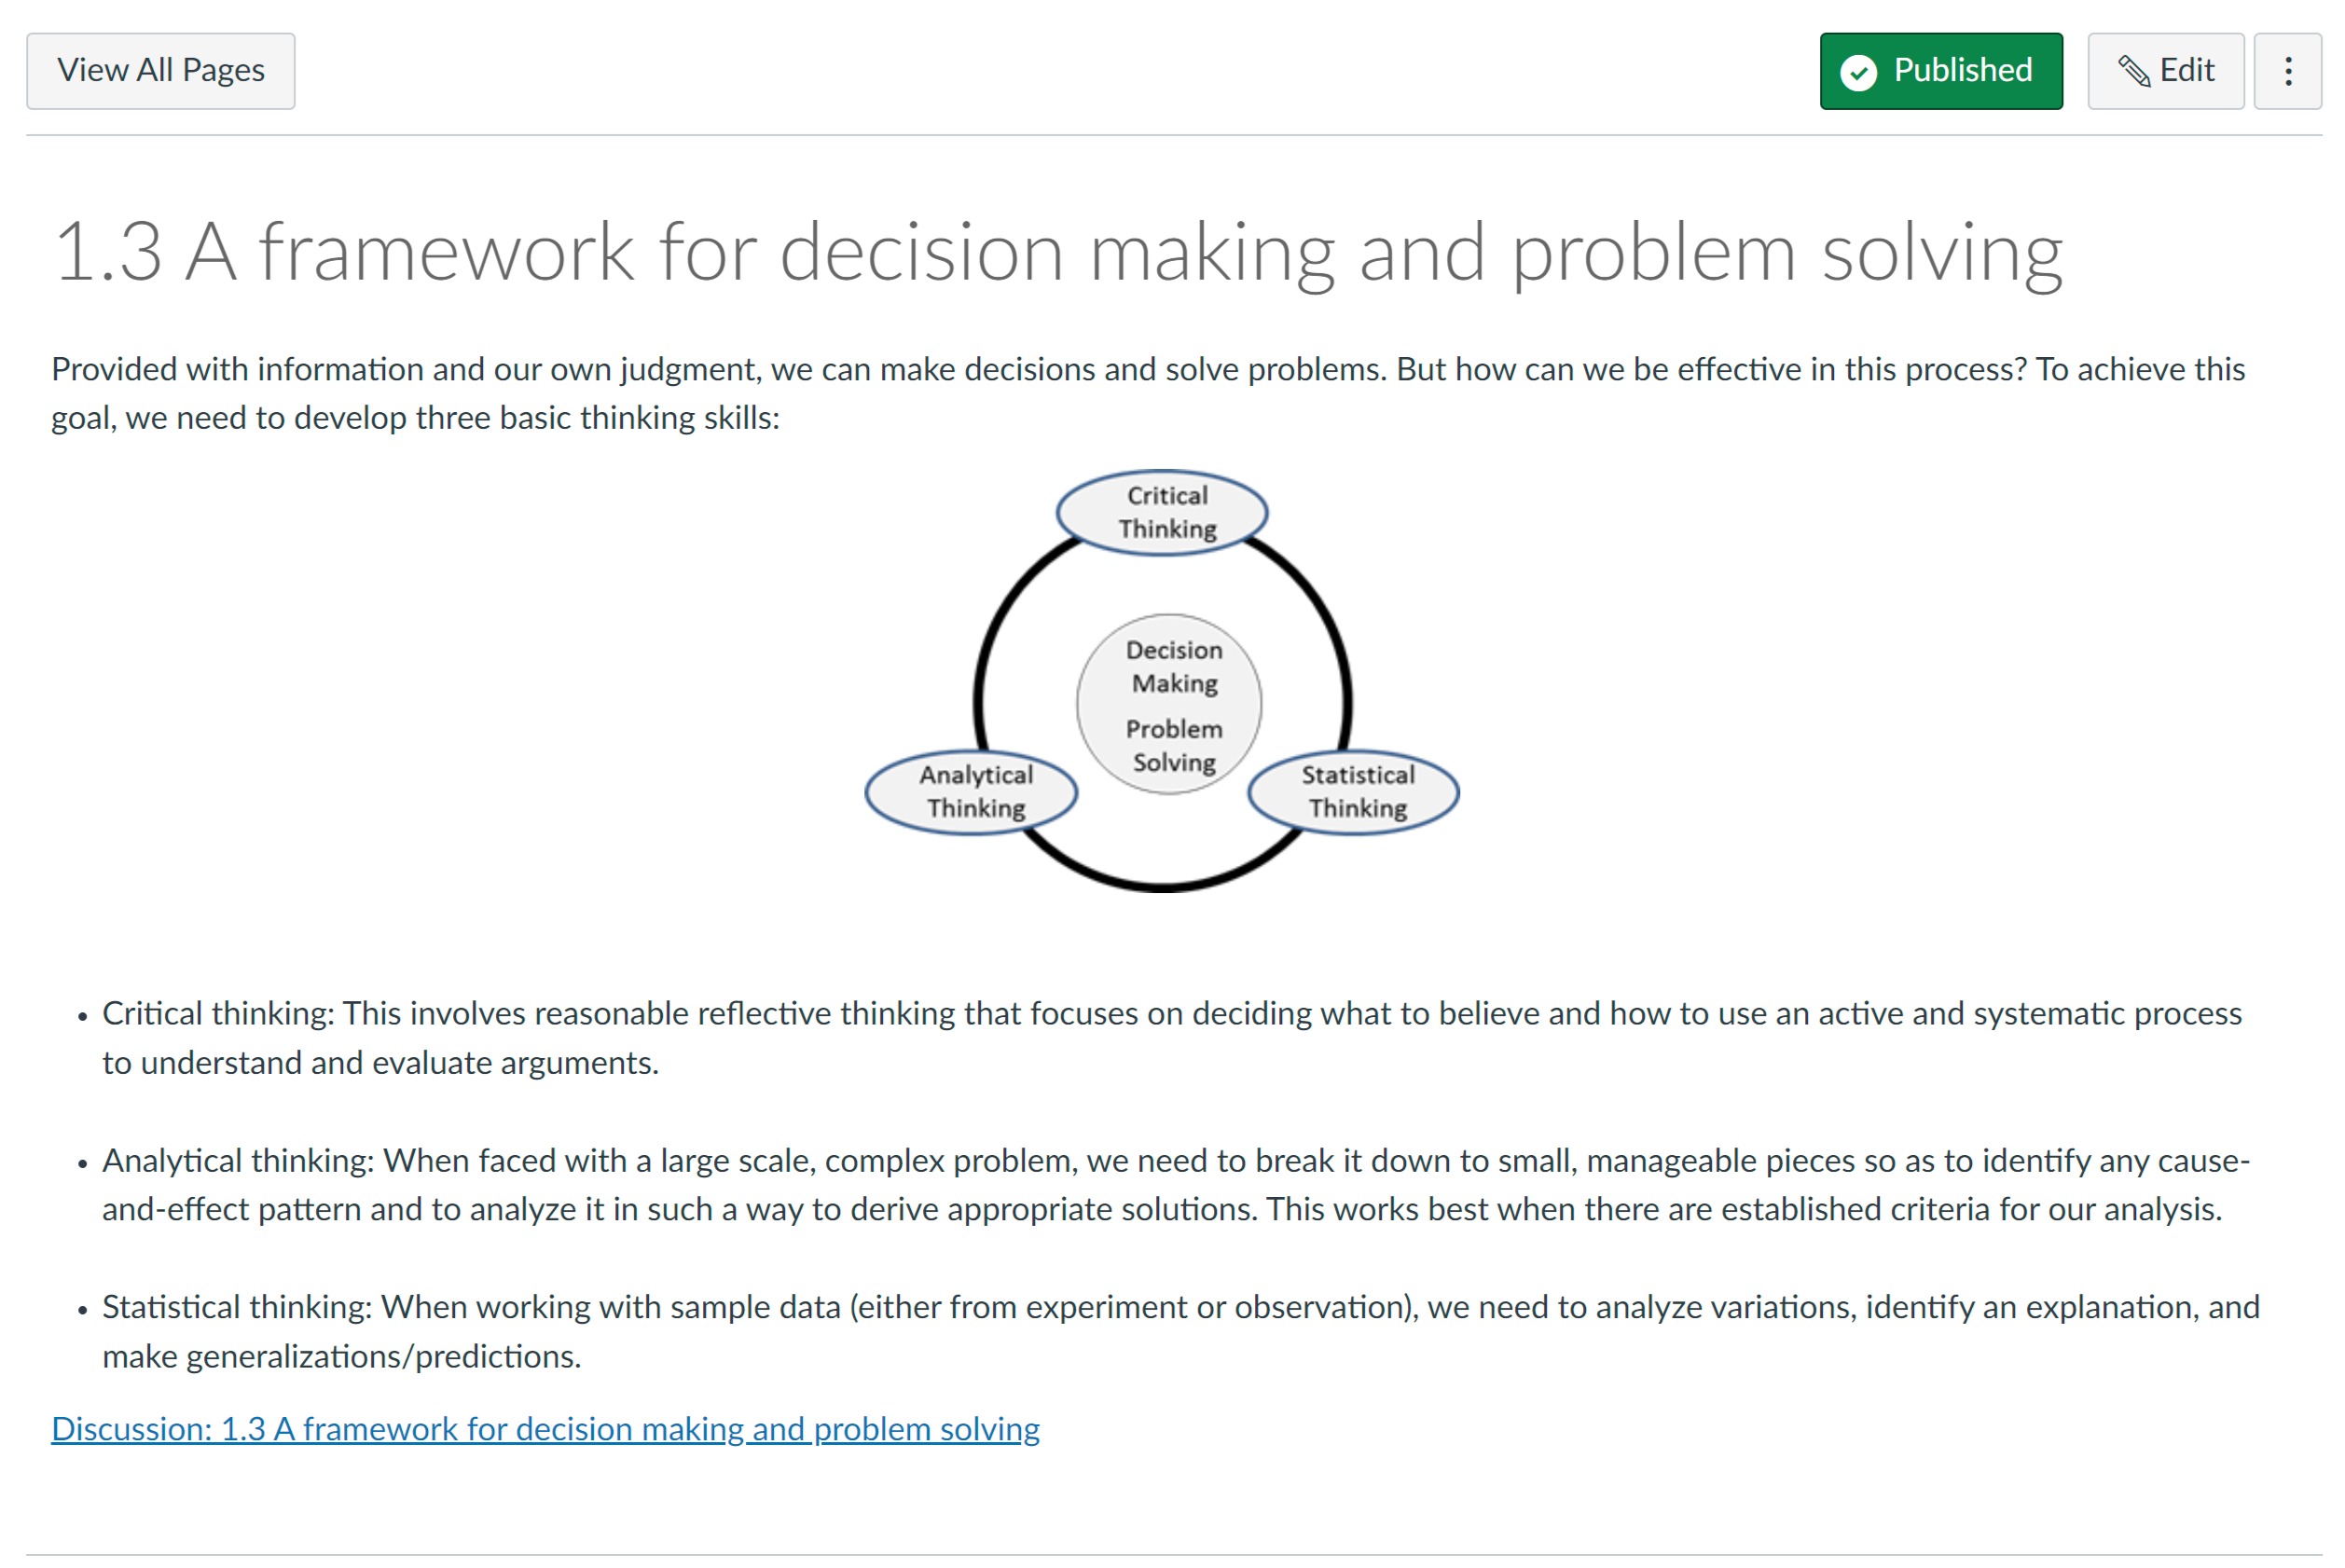
1 | Canvas access and interface
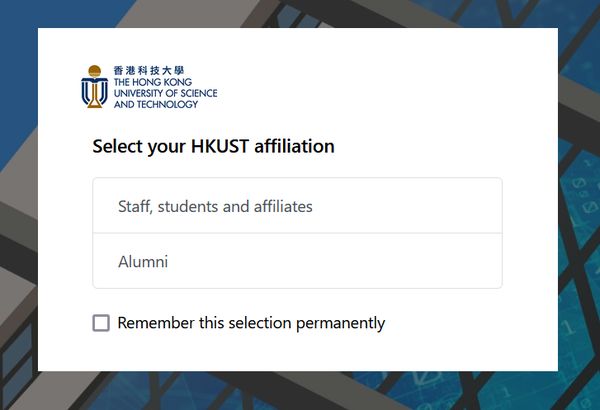
- Open a web browser and go to the URL https://canvas.ust.hk.
- Select the correct account type and log in with your primary email address in account@ust.hk or account@connect.ust.hk instead of the account name alone and password.
If you are experiencing any difficulties logging in to Canvas with your HKUST account, please contact ITSO’s helpdesk via email at cchelp@ust.hk or telephone at 2358-6200.
If you want to sign up for a Canvas course site, please fill in the online application form or email your request to canvas@ust.hk.
Please also see the next point regarding auto-creation of course sites for regular lecture courses When will the course sites be created?
All official regular courses listed under ARO will have course sites automatically generated in Canvas each term once the class details are finalized in SIS. By default, the system creates individual course sites for the lecture (L) sections of each course. If a course does not have lecture sections, course sites will be generated in the following order of priority: laboratory (LA), research (R), and tutorial (T) sections.
If you need a course site to be created before the automatic generation process or require sites for sections that are not created automatically, please submit a request using the online application form. This service is available exclusively to faculty and teaching staff.
The landing page after login is called the Dashboard. The User Dashboard is a summary page of what is happening in all your courses. It allows you to see recent activities across the different courses and figure out what to do next. You can return to your User Dashboard at any time by clicking on the Canvas logo at the top left of the page.
The User Dashboard consists of four main elements:
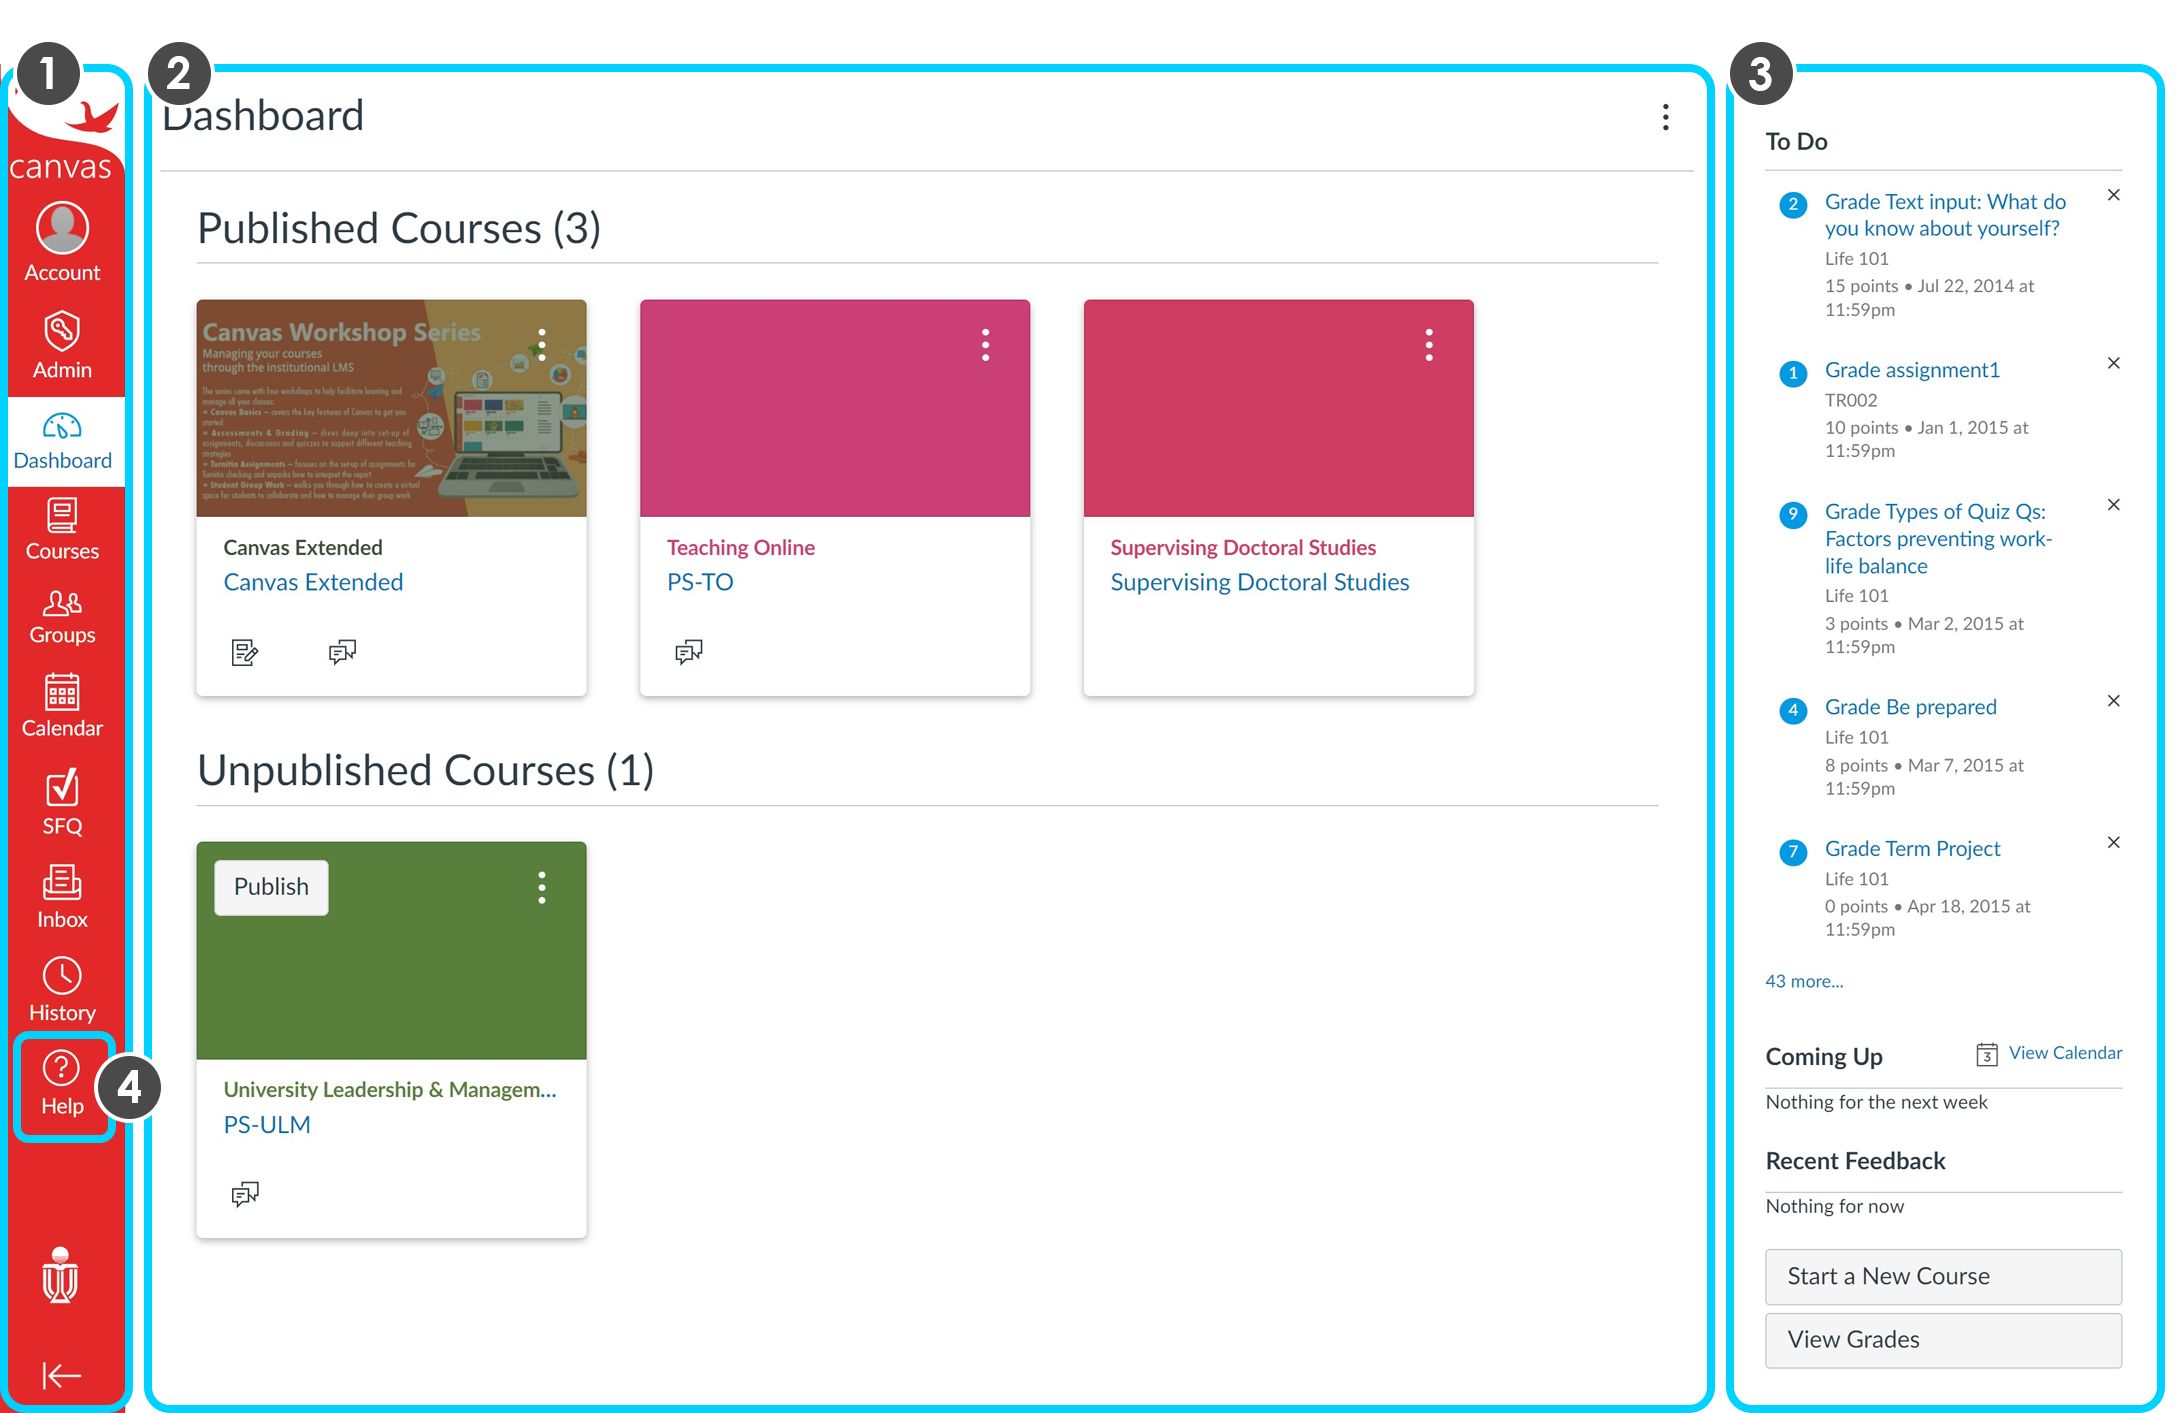
- Global Navigation - provides you with quick access to your Courses, Groups, Calendar, SFQ, and Inbox. Global Navigation also appears on the left of every page in Canvas. You can click the arrow on the bottom to collapse/expand it. Read more...
- The Course cards - by default courses will show as Card View on the Dashboard under two sections, Published Courses, and Unpublished courses. Each card view includes up to four tabs, which represent the four main Canvas features for student course activity: Announcements, Assignments, Discussions, and Files. These tabs mimic visibility and order in Course Navigation, so for instance, if an instructor hides the Announcements link, the Announcements tab will not display under the course activities.
If the tabs are visible, Discussions and Announcements indicate the number of new activity items in the course. Read more... - Sidebar - helps you see what needs your attention across all your courses. It can contain sections such as To Do, Coming Up, View Grades, and SFQ.
- Help - access a list of the guides for Canvas and ways you can seek further help.
To access your courses, navigate to the Courses icon in the left Global Navigation menu of your Canvas page. Select the desired course from the drop-down list. If you do not find your course in the short menu, click on "All Courses" for the complete list. Read more...
If you are enrolled in a certain number of Canvas courses, you have the option to customize which courses you want to display as favorites on your Course list or Dashboard. By marking a course as a favorite using the star icon on the course list page, you can prioritize the courses you want to see.
When no courses are marked as favorites, the course list automatically shows up to 20 active courses alphabetically. However, once you have selected at least one course as a favorite, only those favored courses will be displayed. Read more ...Canvas is designed for extensive compatibility and straightforward requirements. To achieve the best performance, it is advised to use Canvas on the most recent or preceding major versions of Chrome, Firefox, Edge, or Safari. Canvas, being built on web standards, are compatible with Windows, Mac, Linux, iOS, Android, and other devices equipped with modern web browsers.
For Canvas to function effectively, ensure your operating system supports the latest compatible web browsers. It is essential to keep your computer's operating system up to date with the latest recommended security updates and upgrades. Learn more about the browser and computer requirements >>
Certainly. You can access Canvas on your mobile device using any mobile browser or through the Canvas Teacher app developed by Instructure. When launching the Canvas Teacher app for the first time, search for the HKUST Canvas site by entering "canvas.ust.hk" and log in using your HKUST account credentials. Please note that certain Canvas features may not be fully available on the mobile app, depending on your device. Read more…
Once a course has concluded, it will transition into a read-only archived status, accessible under the "Past Enrollments" section within the Course > All Courses page. In this archived state, all users, including instructors, TAs, and students, can only view course materials and grades. However, they are unable to engage in any activities such as submitting assignments or modifying course settings.

Certainly. You can adjust the email notification settings in Canvas. Each notification category offers four options: Notify immediately, Daily summary, Weekly summary and Notifications off. It is advisable to review all notification types and tailor them according to your preferences.
The default settings are universal across all your courses; you can customize settings for individual courses by selecting the specific course from the drop-down menu.
Click here to explore more about the default notification preferences. Follow this guide to learn how to modify the default settings.
Please kindly update your web browser to the latest version and clear cache of your web browser. Then restart the web browser and see if the problem still occurred. If you using a bookmark to open a specific page in Canvas, try to navigate to that page from the Canvas main page at https://canvas.ust.hk.
You may follow the instructions below on how to clear the cache with your web browser.
2 | Setting up your Canvas course site
The Course Home Page, is the first page you see after you’ve selected a course site or clicked the Home link in their Course Navigation. As an instructor, you can customize several areas on this page to create a specific workflow for your students. The Home page contains four main areas:
- Course Navigation Menu – it is a series of links on the left side that help you and your students accessing different tools within your course. The course navigation menu can be collapsible by clicking on the Menu
 icon.
icon. - Breadcrumbs – it shows the tool you are in. You can click on the course code to return to Course Home Page.
- Content Area – This area will display the corresponding content while students go through different components within the course. For the default display when first landing, it can be one of five different layouts depending on the instructor's preference (read more below the image).
- Sidebar - The top of the sidebar contains links for managing your course, this includes the Course Analytics tab. Below the course management tabs, you will see some Coming up events and due dates as well as To Do items if something is waiting for your action.

There are five options to choose from for your Home Page Content Area (3):
- The default is Modules, which helps the students navigate through your course contents, we recommend you to select Modules for the home page, if you are using it.
- Course Activity Stream which shows the recent activities in the course.
- If you have created a specific page that you want to use as a welcome page, choose the Pages Front Page and select that page from a dropdown list. Note: you need to create the page first.
- If you are using Canvas mainly for online assessments, select Assignments List.
- Alternatively, you can use the Syllabus page as the home page.
Learn more about layout options available on the Course Home Page >>
Learn more on how to change the Course Home Page >>
Initially, all menu items (Announcements, Discussions, Grades, People, etc.) are active in all courses. However, we recommend reorganizing and concealing certain items to streamline the interface for students. Notably, while students may not view these hidden items, instructors and TAs retain visibility and access to them.
To rearrange and selectively hide Navigation items, navigate to the course settings and access the Navigation tab. For further details on this process, refer to the additional information here.
Please note the following:
- Menu items cannot be renamed.
- If an item lacks content, it will automatically be hidden from the Student View and display a Visibility icon (crossed eye icon) for teachers and TAs.
- More Tools is a tool developed by UST exclusively for instructors and TAs. Even if enabled on the Navigation menu, students cannot view and access these items.
Canvas automatically syncs the records of officially listed instructors, students, and teaching assistants for each course. However, additional support staff such as IAs, department support personnel, or auditing students must be manually added to the course either by the instructor or by submitting a request to Canvas support.
To request the addition of supporting staff to a course, please send an email to canvas@ust.hk, ensuring the course instructor is copied in the email for acknowledgment.
To add a user to your course: or SIS ID (Student ID).
- Navigate to the People tool in the left menu of your course.
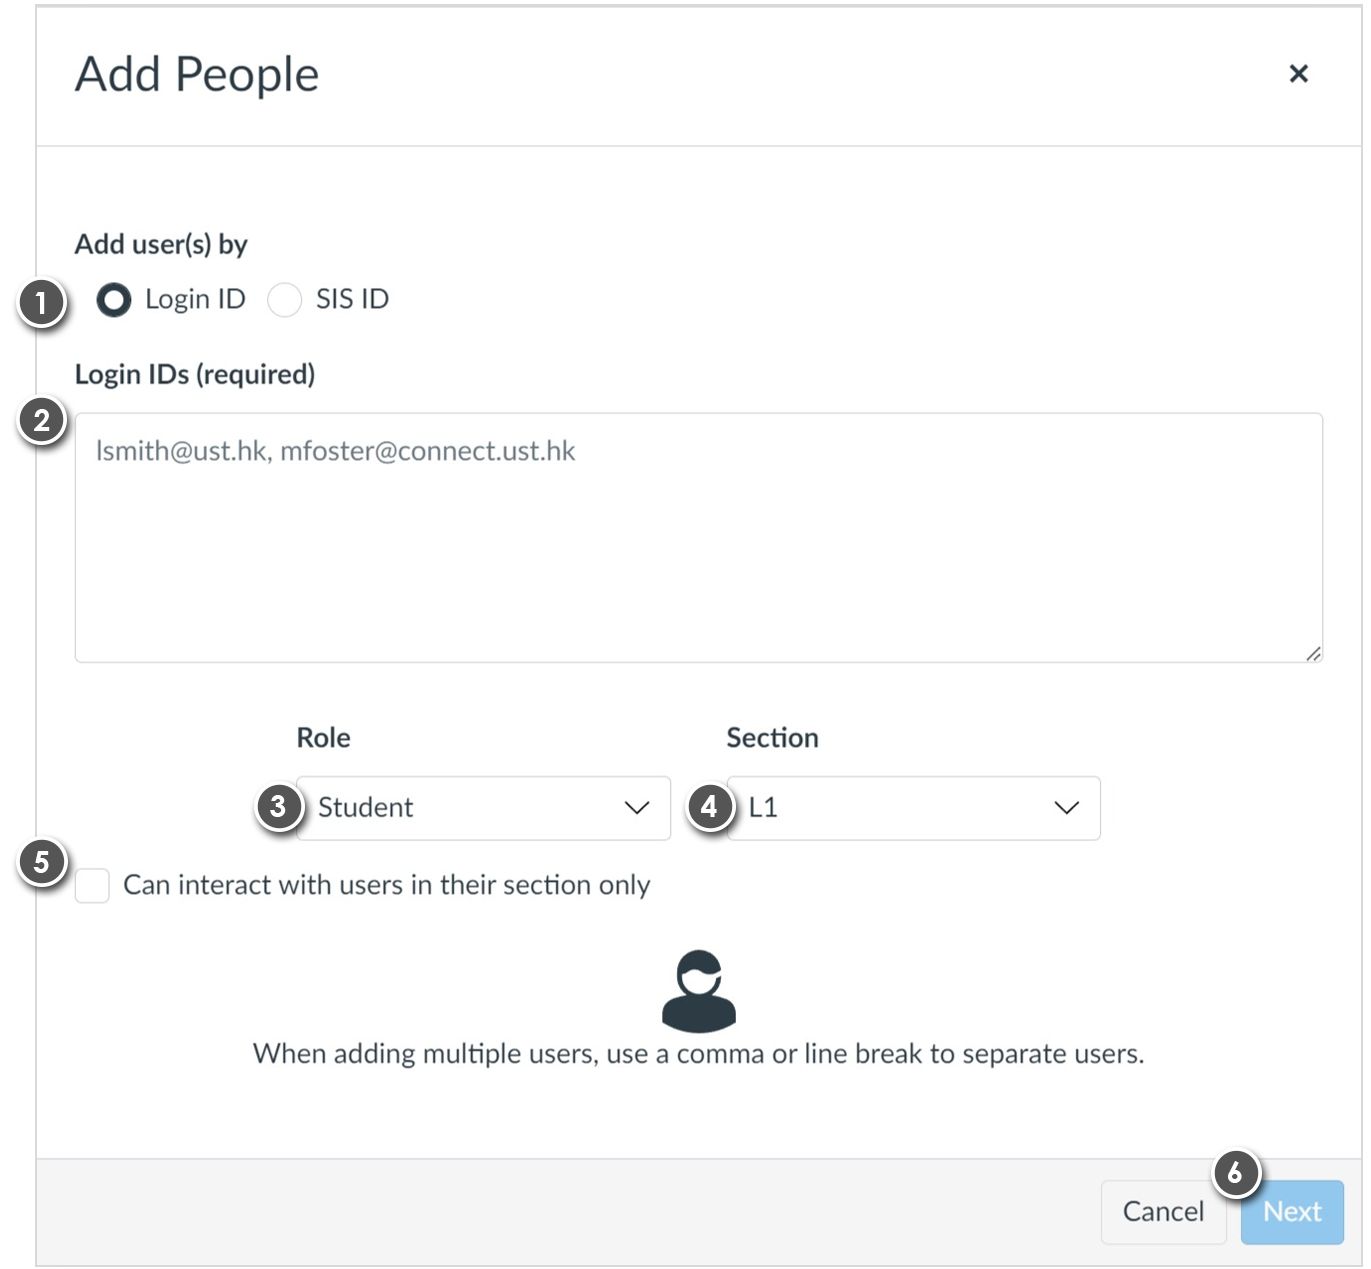
- You can add user(s) by Login ID or SIS ID [1].
- Choose the type by selecting the radio button and enter the corresponding user information in the text field [2]:
- Enter the User's full HKUST official email if selecting "Login ID" (aliases are not supported).
- Enter the student ID if selecting "SIS ID."
- You can add multiple users simultaneously by separating them with commas or line breaks.
- Select the role from the Role drop-down menu [3]. Common roles in Canvas include Teacher, Course Admin, TA, and Student. The Course Admin role should be assigned only to departmental staff or IAs involved in user management and general course site maintenance.
- Assign a section from the Section drop-down menu [4].
- Optionally, restrict the TA's grading permissions to their section by checking the "Can interact..." checkbox [5].
- Click the Next button [6]. Canvas will verify the account; if confirmed, click the Add Users button.
Once a course site is created, Teachers, Course Admins and TAs can always access the course site. After the term start date is reached, students can see the course title in the list of courses they are enrolled in but they can only access the course site if the course is published by the Teachers.
The course site will NOT be published automatically after the term has started.
When a course reaches the course end date, the course will be completed and become concluded. In a concluded course, instructors, TAs and students can no longer participate in the course and the course is archived in a read-only state. Students may be restricted from viewing concluded courses. Instructors or all other supporting roles will no longer able to update/modify concluded courses.
Yes. You can overwrite the default start and end dates for your course from the course Settings before the course turn into Read-only, in other words, before it reaches the Canvas Term End Date.
Find out how to change the dates >>
NOTES: Make sure an End date has been given, do not leave it blank, if decided to set a preferred date settings with “Course” selected.
Yes. You can change student access settings to allow or restrict students from viewing your course before the start date or after the end date. Find out how to change the dates >>
Yes. Canvas provides a way to copy a whole course or specific content from another Canvas course. You can use this tool when you want to use or repurpose previously created content including course settings, syllabus, assignments, modules, files, pages, and discussions. You can also import and adjust events and due dates.
The function is under course Settings, in the right sidebar Import Content into this Course. Find out how to copy a Canvas course >>
NOTE: Draft State settings are retained in course imports. If an assignment is unpublished in a course, the assignment will also be unpublished in the content import.
If you are enrolled in a blueprint course as an instructor, you can sync blueprint content changes to associated courses. Read more about:
How do I lock course objects in a blueprint course as an instructor?
How do I sync course content in a blueprint course as an instructor?
How do I view the sync history for a blueprint course as an instructor?
If your content index pages include Blueprint icons, your course is associated with a blueprint course. Blueprint Courses are courses managed as a template and may contain locked objects managed by a Canvas admin, course designer, or other instructors. Locked objects may include attributes for content, points, due dates, and availability dates. Attributes may apply to some or all object types: assignments, discussions, pages, files, and quizzes. Read more about:
How do I manage content for a course associated with a blueprint course?
How do I view the blueprint sync information for a course associated with a blueprint course?
You can view a course the same way that your students view your course through Student View. Enabling Student View creates a Test Student in your course. You can activate Student View in your Course Settings. With this Test Student, you can see the student's perspective on Canvas. You can preview the course, post and reply to discussions, submit assignments (except assignments using external tools e.g. Turnitin), view grades, pages, and syllabus, view and try out quizzes, etc. Read more about how to view your course using Student View >>
By default, Canvas courses are not published, meaning that students will only see the course title but are not able to access the course site yet. Instructors can utilize the time when a course is initially not published to set up their course for the semester.
It is also possible for instructors to unpublish their course sites, which will prevent students from accessing the course. But once your course contains a graded submission, you can no longer unpublish your course.
You can publish your course in the Course Home Page sidebar when the course is ready to launch to students. Read more about how to publish a course >>
Please note that:
- Publishing a course will send out invitations right away to any users added to your course manually, or will be sent on the course start date if a specific date has been assigned to the course setting
- Canvas by default has set Modules as the Course Home Page. If you are not using the Modules in your course, you have to select another layout for the Course Home Page. Learn more about the different layout options for the course home page at What is the Course Home Page?
3 | Building up your Canvas course site
Canvas is a comprehensive Learning Management System (LMS) with a wide array of features, which can be grouped into four main categories:
- Content Delivery: Modules, Pages, Files, Syllabus, Conferences, Collaborations
- Student Assessment: Assignments, Quizzes, Grades, Discussions
- Communication: Announcements, Conversations, Discussions
- Monitoring Participation and Progress: Course Analytics, Quiz Analytics, People
To enhance learning and usability, we recommend using Modules as the starting point. Modules allow you to organize files, pages, videos, quizzes, assignments, and discussions into a structured sequence. Think of Modules as a table of contents that provides students with a clear, step-by-step learning path to follow. Learn more about Modules >>
The Syllabus in Canvas makes it easy to communicate to your students exactly what will be required of them throughout the course in chronological order. It contains three main parts: the syllabus description [1], the syllabus table automatically managed by Canvas which will contain all the graded assignments and scheduled events in the course [2], and the sidebar with a calendar and weighted assignment groups [3]. You can also set the syllabus as your course home page.
To edit the Syllabus Description, click Edit. Learn more on how to edit the Syllabus >>

You can customize the visibility of the course Syllabus to the Institution level from the Course level so that students who are not enrolled in your course can view the information about your course on the Syllabus page by sharing the page link. Learn more on how to make your syllabus open to unerolled students >>
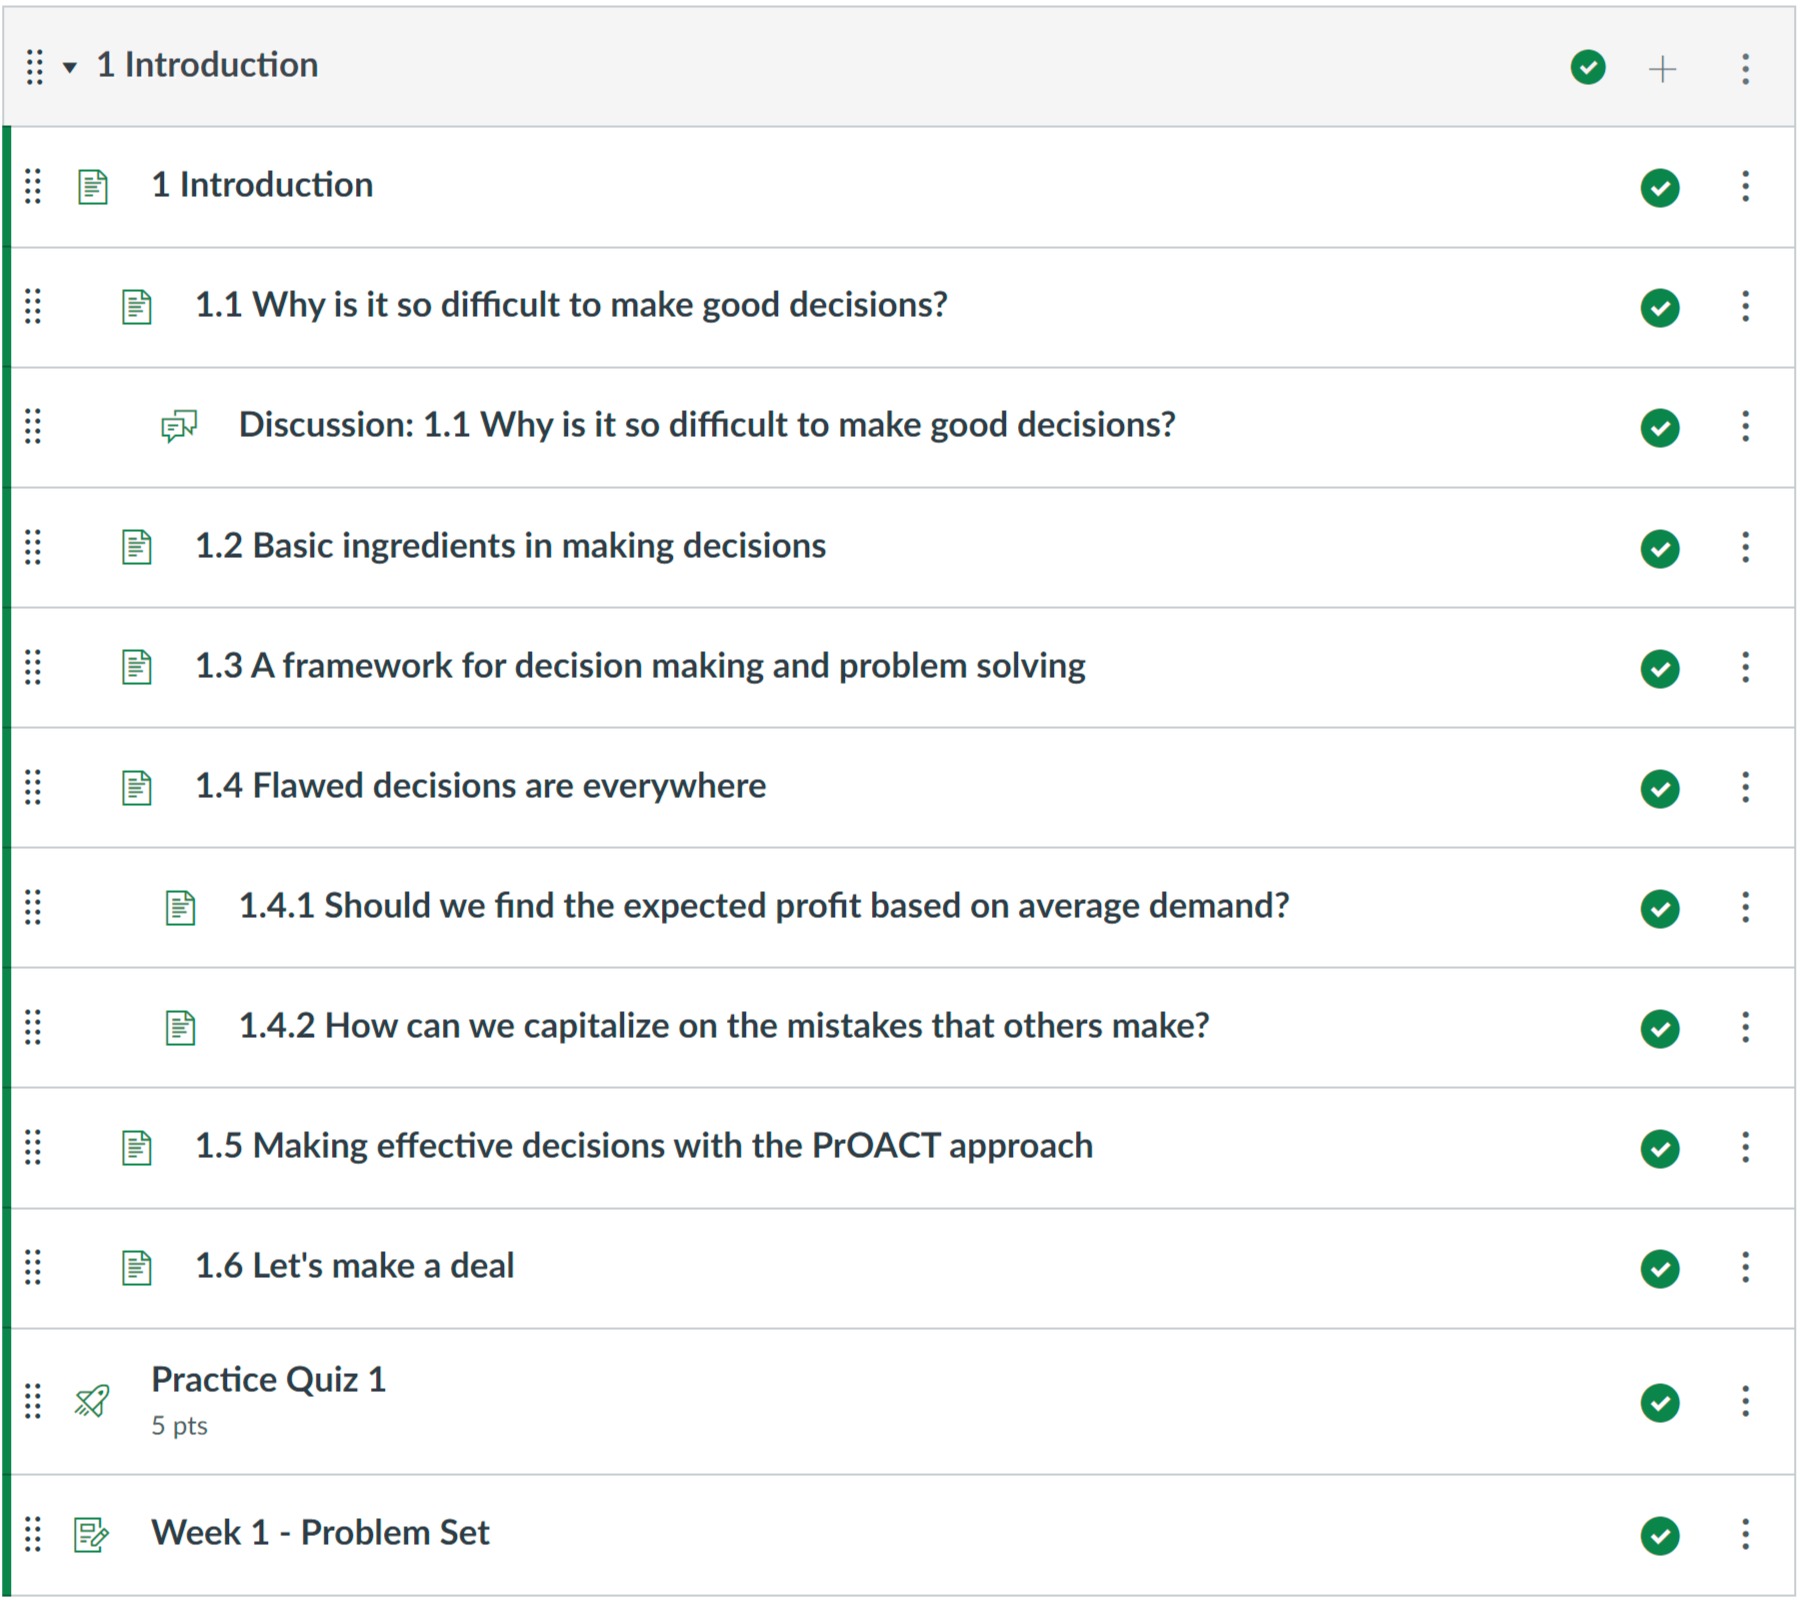
Modules can be used to organize course materials such as files, pages, videos, quizzes, assignments, discussions, and others into a sequence. The Modules are something like the table of contents for the course, which provides a clear learning path for your students to follow. Depending on the instructor, modules can be used to organize course content by weeks, lectures, or topics. You can see an image of a sample module with content pages, a discussion, a quiz, and an assignment below. Learn more about Modules >>
You can make use of the tool Pages to combine text, video, files, and links into a single page. This tool also allows embedding and viewing PowerPoint slides, pdf files, and images directly online. This is a good strategy if you have several different resources you want the students to cover on a single topic.
You can create the page directly through Modules or the Pages tool. It can also be added to the Modules to build up the learning sequence for your course.
Pages can also be used as a collaboration tool where you can create class wikis and set specific user access for each page. Canvas keeps the entire history of the page so you can see how it changes over time.
Read more about how to create a new page >>
Learn more about Pages >>
Using the Rich Content Editor, you can upload and embed media files from your computer. Several features in Canvas support the Rich Content Editor, including Announcements, Assignments, Discussions, Pages, and Quizzes. Canvas allows you to upload supported media types.
Canvas converts files up to 500 MB. If a file exceeds the 500 MB limit, you can host the file through an external source such as YouTube and embed it using the Rich Content Editor. Learn More details >>
Assignments is a tool which shows all graded assessments in your course, including assignments, graded quizzes, and graded discussions. It will also display the deadlines and the points awarded for each type of assessment.
This tool allows you to create new Assignments. You can also use it to create different groups of assignments and you can adjust the weight you give to each assignment group. Assignments can be assigned to everyone in the course or different sections.
Please note that if you create an assignment with this tool, it does not appear automatically in your Modules sequence. Therefore if you are using Modules to organize the content of your course, it is best to create the assignment directly through the tool Modules.
There are two main ways you can create an assignment for students.
- Create an assignment placeholder, also known as shell, in your learning sequence Modules and then edit the placeholder to add instructions, type, settings, and due dates. Learn more >>
- If you are not using Modules to present the content to the students, then you can use the Assignment tool in the navigation of your course. Learn more about how to create a new assignment >> or how to add/edit assignment details >>
When you choose to display grades as Letter Grades / GPA scale to an assignment, you will have the option to assign a grading scheme. Learn more about how to add a grading scheme >>
When creating or editing an assignment, instructors can specify whether the assignment should be for everyone in the course, for specific sections, for specific group if groups are created, or for individual students. Availability date functionality is still available for each assignment.
When using differentiated assignments with the Gradebook, the assignment appears as a column for all students, but grade cells are greyed out for students who have not been included in the assignment. Grades cannot be assigned for students who have not been included in the assignment, and assignments that are not assigned to a student are not factored into overall grades.
On the student grades page, students can only view assignments that are assigned to them, either individually or as part of a course or section.
Learn more about how to assign an assignment to an individual student or section >>
The Turnitin integration known as the Canvas Plagiarism Framework is incorporated into our HKUST Canvas environment. This integration offers enhanced features such as plagiarism checking for group assignments and the ability to provide feedback using Canvas rubrics. It also simplifies the process of setting up Turnitin checking within assignments.
When creating an assignment in Canvas, simply select “Text Entry” or “File Uploads” as the submission type. The option for “Plagiarism Review” will then automatically appear. After selecting Turnitin from the dropdown menu, additional settings such as “Store submissions in:”, “Compare submissions against:”, and other report options will be available for you to configure the Turnitin parameters. You can refer to the next topic for more details.
For more information on the Canvas Plagiarism Framework, click here to view Canvas Plagiarism Framework guides.
To add Turnitin checking to an assignment, first you create an assignment in Canvas as usual.
- Complete the settings for the Title, Description, Points, Assignment Group, and Grades Format.
Notes: Students can now submit group work for Turnitin checking through the Canvas Plagiarism Framework; each student in a group will receive an individual similarity score.
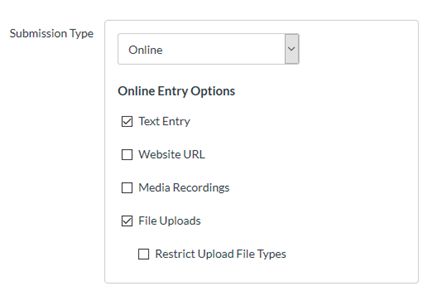
- In the Submission Type drop-down menu, select Online.
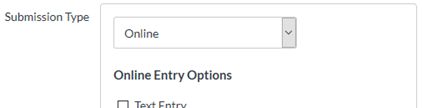
- Under Online Entry Options, check Text entry or File Uploads. Either of these options will activate the Plagiarism Review settings.
- Select Turnitin from the Plagiarism Review drop-down menu.
- Configure the following Turnitin settings:
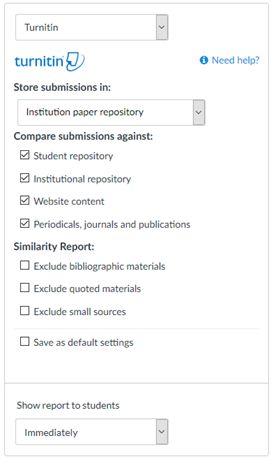
- Store submissions in:
- Standard paper repository – Will check students’ submissions against student papers from other institutions.
- Institution paper repository – This repository is only accessible to HKUST users. The system will check students’ submissions against other HKUST student papers stored in this repository. With this setting enabled, if an HKUST student submission matches a paper of a student from another institution, Turnitin will not notify you of this match.
- Do not store the submitted papers – A Similarity Report will still be generated for paper submissions, but your students' submissions will not be stored in the Turnitin standard paper repository or the institution's paper repository for future comparison. (Use this option for testing the Turnitin feature.)
- Compare submissions against: Check all four boxes for optimal originality checking.
- Similarity Report: We suggest users keep all these settings unchecked. This means the reports will include as many matches as possible. The “exclude” settings can be turned on while reading the report.
- Show report to students:
Select the option that suits your needs.- Immediately
Students will be able to see the Similarity Report as soon as they submit their assignments to Canvas. - After the assignment is graded
Students will be able to see the Similarity Report as soon as their assignments have been graded in Canvas. - After the due date
Students will be able to see the Similarity Report as soon as the assignment is due - Never
The Similarity Report will only be available to instructors but not the students.
- Immediately
- Store submissions in:
- Continue to set up the rest of the assignment settings, such as the Assign to and date options as usual.
Notes: If the assignment has multiple due dates, make sure you create an additional due date option with 'Everyone else' selected. This will cover everyone with a collusion check on that additional due date.
- Select Save to save the assignment. Select Save & Publish to save and publish this assignment.
Notes: If the system kept failing to generate a Similarity Report in Gradebook, you will see a “!” at the Similarity Score icon. You can select Resubmit to Turnitin in the SpeedGrader. This will force the system to generate the Similarity Report again.
Click here to learn more about how to create an assignment with Turnitin checking using Canvas Plagiarism Framework >>
The Originality report can be accessed from the SpeedGrader or Gradebook in Canvas. You can use SpeedGrader to view the originality report and grade just as a normal assignment.
Notes: No grades will be auto-synchronized between Turnitin and the Canvas Gradebook. Grades must be input directly in SpeedGrader or Gradebook in Canvas.
- To open the originality report, launch the SpeedGrader of the assignment.

- Click on the similarity score icon to access the originality report.

- Grades and comments can be inserted in the Assessment and Assignment Comments on the right panel in SpeedGrader.
The originality report will present to you an overall percentage of text that matches with other resources. This overall percentage is only an indication; it is not enough to conclude if a paper is plagiarized or not.
When you click on the similarity score icon that shows a percentage number, you will see the detailed originality report. It highlights the parts of the student paper that match any of the sources within Turnitin.

There is a chance that a text with the proper citation will also show up in the report as a match. So it is crucial that you look at the details of the paper, not simply review the overall percentage.
Beware also that there are some tricks used by students to fool Turnitin and reduce the matched text. You must review the submitted work with care.
Canvas provides an integrated system for class discussions, allowing both instructors and students to start and contribute to as many discussion topics as desired. Discussions can also be created as an assignment for grading purposes (and seamlessly integrated with the Canvas Gradebook), or simply serve as a forum for topical and current events. Discussions can also be created within student groups. Learn more about Canvas Discussion >>
You can create discussions directly through Modules or using the Discussion tool in the navigation bar on the left. Learn more about how to create a new Discussion in Canvas >>
The Quizzes in Canvas, also referred to as Classic Quizzes, are assessments designed to evaluate student understanding and comprehension of course material. There are four types of quizzes available: graded quizzes, practice quizzes, graded surveys, and ungraded surveys. Quizzes are automatically graded unless they contain open-ended questions.
You can include a variety of question types within a single quiz, such as Multiple Choice, True/False, Fill-in-the-Blank, Fill-in-Multiple-Blanks, Multiple Answers, Multiple Drop-down, Likert scales, Matching, Numerical Answer, Simple Formula questions (or with a single variable), Essay (open-ended questions), and File Upload. Most question types support automatic grading, except for Essay and File Upload questions, which require manual grading.
-
How do I create a Quiz with individual Questions?
You can add a quiz through Modules or the Quizzes tool. You can combine many different types of quiz questions into one quiz. Learn more about how to create a quiz with individual questions >>
-
Is there any limit on the number of questions in each quiz?
Quizzes in Canvas do not have any limit on the number of questions, but it does have a limit on the Quiz Statistics and SpeedGrader. It will be recommended to keep the total number of questions for each quiz under 100. -
How do I create a Quiz with a Question Group to randomize quiz questions?
If you want to randomly draw questions from a pool of questions and display different combinations of questions to each student, you need to create a quiz with Question Groups. This is a good practice if you want to minimize the sharing and copying of answers.
You can create a quiz using one or more question groups (question pools). You can choose the number of questions that should be picked from a group and how many points should be given. Creating a question group randomizes questions within a quiz. Learn more about creating a randomized quiz with Question Group >>
-
How do I use Question Bank in my course?
Question Banks are a collection of all of the quiz questions you’ve created in a course; a sort of database of questions. Question Banks store quiz questions so that you can reuse them across different courses.
Learn more about how to create a Question Bank >>
By default, Question Banks are linked to the course where they were created. However, you can make it available in other courses by bookmarking it.
Learn more about how to bookmark a question bank in a course >>
Learn more about how to move/copy a question from one question bank to another >>
Learn more about how to move multiple questions from one bank to another >> -
Can I share a Question Bank with other Canvas courses?
Yes. You can share a Question Bank with several courses with other Instructors/TAs by importing the Questions bank from one course to another. Learn more about how to import a Question Bank >>
New Quizzes is a modern quiz engine integrated with Canvas that offers enhanced functionality and more advanced settings compared to the existing Classic Quizzes. By default, New Quizzes is disabled in our Canvas instance, but you can enable it anytime via Course Settings > Feature Options. New Quizzes provides a wider variety of question types along with more detailed and flexible settings for both overall quizzes and individual questions, allowing for greater customization and instructional control. Learn more about the New Quizzes >>
When students take quizzes in Canvas, it’s important that they understand how to navigate the quiz interface, manage their time, and handle technical issues. To help your students prepare, you can share these key points:
Before the Quiz:
- Familiarize with the Canvas Quiz Interface
Encourage students to explore how to navigate between questions, use the question list, and flag questions they want to revisit later. Familiarity with these tools helps with effective time management during the quiz. (You can direct students to the official guide: How to Take a Quiz in Canvas) - Check Internet Connection and Device
Recommend using a stable internet connection on a reliable device such as a laptop or desktop. Advise against using mobile apps for quizzes to avoid connectivity issues. - Use a Supported Web Browser
Instruct students to use recommended browsers like Chrome or Firefox, ensure their browser is up to date, avoid private/incognito mode, and clear cache or close extra tabs/windows before starting the quiz. (Refer students to: Browser and Computer Requirements for Canvas) - Understand Quiz Settings
Students should read all quiz instructions carefully, noting time limits, number of attempts allowed, and visibility of answers or feedback. - Be Aware of Due Dates and Lock Dates
Remind students to take quizzes before the due date and that some quizzes may become inaccessible after the lock date/time.
During the Quiz
- Monitor the Timer Closely
Especially for timed quizzes, students should keep an eye on the countdown timer and pace themselves accordingly. - Use Navigation Tools Efficiently
Encourage use of the question navigator and flagging feature to jump between questions and keep track of those needing review. - Avoid Multiple Browser Tabs or Windows
Opening multiple tabs or browsers during a quiz may cause technical issues or jeopardize quiz integrity. - Submit Carefully
Students should ensure they submit the quiz properly and not just navigate away from the page, especially if some questions remain unanswered. - Review Answers if Allowed
Depending on settings, students may have the option to review their answers after submission and should take advantage of this.
Additional Tips & Troubleshooting
- Canvas Tracks Student Activity
Students should know that Canvas records their quiz activity, such as page loads and submission times. - Reliable Technology
Reinforce the importance of using a stable device and internet connection. - What to Do If Problems Occur
Tell students to contact you or the TA immediately if they experience technical difficulties, such as lost connection or submission errors. - Understand Quiz Variations
Different quizzes may have various rules (e.g., open/closed book, retake policies), so students should always review quiz details before starting.
The Files is a tool where you can upload course files, syllabus, readings, or other documents. It is also where you can find already uploaded files through Pages and Modules. Once you have uploaded the files, you can link them to Modules, Assignments, and Pages. You don’t need to upload them multiple times.
Files and folders are put in alphabetical order and cannot be rearranged. As an instructor, you can lock the folders so students cannot access your files. We don’t recommend you use files for student access to readings because you cannot arrange them in a way that is easy to follow by students. Learn more about Files >>
As an instructor, Files allows you to store files (handouts, readings, references, videos, etc.) within Canvas. You can upload one or multiple files, view all details about your files, preview files, publish and unpublished files, set usage rights, and restrict access to files. The files are shared between all instructors/TAs.
Learn more about how to use Files in Canvas >>
Learn more about how to move and organize my files >>
Users can edit permissions for files, including setting the state of the file (published or unpublished), restricting file access to students who have the link, or scheduling availability dates for the files.
Learn more about how to restrict files and folders to students >>
BigBlueButton (Conferences) are primarily used for virtual lectures, virtual office hours, and student groups. Conferences allow you to broadcast real-time audio, video, and demo applications on your desktop, share presentation slides, or demo any online resources. Currently, the service is provided by a third-party BigBlueButton.
The Conferences tool is part of the group space for students so they can start their conferences without the need for moderation by the instructor/TA.
Note: For best performance, Conferences should be limited to 25 users or fewer.
Learn more about BigBlueButton (Conferences) >>
Canvas leverages Google Docs and MS Office 365 to allow multiple users (up to 50 collaborators for Google Docs) to work together on the same document at the same time. Collaborative documents are saved in real-time, meaning a change made by any of its users will be immediately visible to everyone.
The Collaborations tool is part of the group space for students so they can start their documents without the need for moderation by the instructor/TA. Learn more about Collaborations >>
If you fail to sign in to the Collaborations in Canvas with your HKUST Office365 account, please follow the steps to reset the token.
4 | Creating and managing Groups on Canvas
Canvas allows you to easily group students using one of the three methods:
- manually arranging students into groups;
- randomly assigning students into groups;
- and allowing students to self-sign up for groups.
Canvas also allows you to create different sets of groups (e.g. Discussion groups, Project groups, Lab groups) within the same class. Once the groups are created, Canvas automatically creates a safe online space for each group to collaborate on Canvas with their discussion board, file storage, and announcement board.
Once you have created groups in Canvas, it is very easy to link those groups to assignments and discussions, thus allowing group online submissions.
Group Sets hold the different groups within a course. For example, you can have one group set for Group Discussions, another for Group Lab exercises, and a third for Group Project work. Once you have created a group set, you can manually create groups in the set or automatically create groups in the set.
Learn more about how to create a group set >>
Explore other topics related to managing Groups on Canvas >>
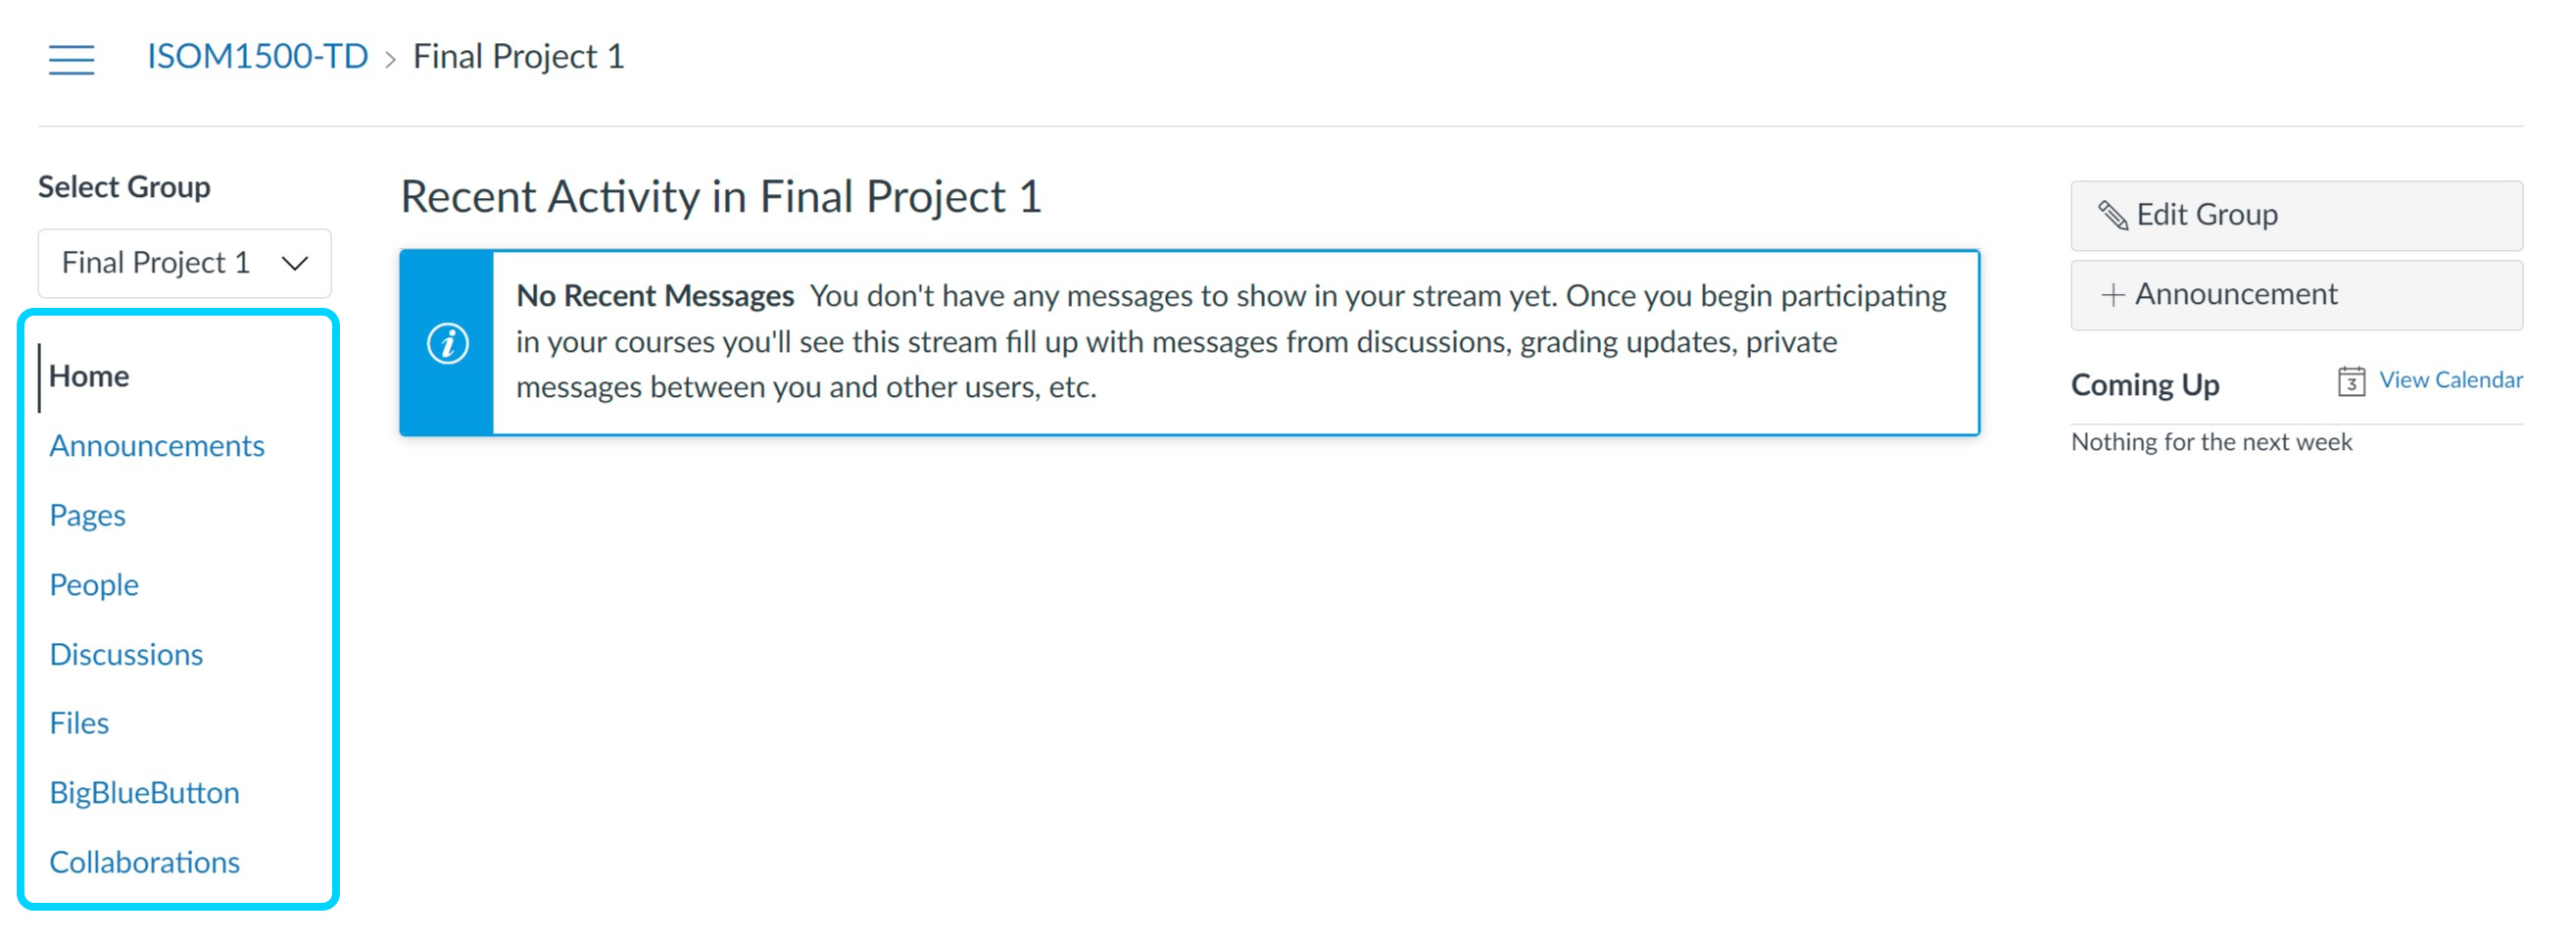
Once groups are created on the course site, the system will automatically create a group homepage for each group. The group homepage can only be accessed by the group members and the course staff (instructors and TAs).
The tools, including the Announcements, Pages, People, Discussions, Files, Conferences, and Collaborations, are available on the Group home page for group members to use.
Learn more about how to view content and student activity within a group >>
Once you have your Group Set created, you can then create an assignment and assign it to the group set. And each group within the group set that is assigned to the assignment can then submit to the assignment as a group. Learn more about how to assign an assignment to a course group >>
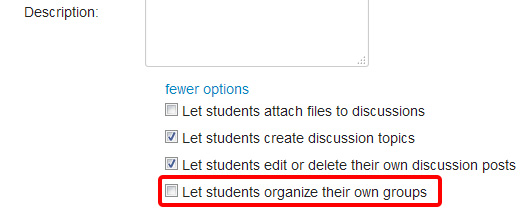
By default, Canvas allows students to create their own Student Groups for purposes such as study sessions or assignment discussions. Students can join multiple groups, which will be accessible under the Student Groups tab. They also have full control to manage these groups independently.

However, this feature may cause confusion if you intend to use groups created by instructors or TAs for formal activities. Therefore, the option “Let students organize their own groups” is disabled by default in Course Settings. You can enable it anytime if needed via Course Settings > Course Details, under the "more options".
5 | Grading your students on Canvas
SpeedGrader is a tool that makes online grading and feedback on assignments easier. You can find this tool whenever you are looking at any gradable and published assignments, quizzes, or graded discussions. It is normally located at the top of the right panel of the relevant screen. You can use SpeedGrader to:
- read, evaluate and download student’s submission
- input student grade
- provide feedback as a comment
- provide feedback directly onto the online submissions (pdf, doc, PPT files)
- input and use rubric to grade
Note: It is a good practice to mute the assignments before starting to grade students. This way some students will not see their grades before others. See point 5.4 below for more details.
Learn more about What is SpeedGrader? | How do I use SpeedGrader? | More on SpeedGrader
By default, Canvas allows students to see assignment grades as soon as the instructor has graded the assignment. In some cases, instructors may wish to hold student grades until all assignments have been graded, and then release grades to all students at the same time. You can use the Grade Posting Policy in Canvas Grades to help archive it.
Canvas courses have an Automatic posting policy by default. When a posting policy is set to automatically, grades will be automatically posted to students when they are entered. When a posting policy is set to manually, grades must be manually posted to students using the Post grades option before they can be viewed.
Grade Posting policies can be set for an entire course and/or individual assignment. Assignment-level posting policies will override the course-level posting policy for that assignment.
Released grades can also be hidden from the students by using the Hide grades option. The Hide grades option only hides grades that are already released and currently visible to students. To ensure all future assignment grades are hidden, you will need to use a manual posting policy for the assignment or course.
To enter grades for no submission assignments, e.g. paper-based exams, presentations or participation grades, you will first need to create a “No Submission” or “On Paper” assignment for manual grading. Learn more on how to create a no submission assignment >>
The Gradebook helps instructors easily input and distribute grades for students. Grades for each assignment can be calculated as points, percentages, complete or incomplete, pass or fail, GPA scale, and letter grades. Assignments can be organized into groups for weighting as well. You can refer to 5.5 below for more information. Learn more about Gradebook >>
Assignment Groups are used to organize assessments into groups and set different weights for each group. For example, a course usually has several different assessments such as online quizzes, group projects, and exams. Each of these assessments contributes a different percentage to the final score. In Canvas, we use Assignment Groups to tell the system how to calculate the score so that each group has a different weight. Learn more about how to add Assignment Groups>>
Once you have the groups, click the settings gear icon under the Assignment tool and tick the setting Weight final grade based on assignment groups. Then enter the percentage for each group and save. Learn more about how to assign the weighting to Assignment Groups >>
When creating an assignment, instructors have the option to choose if they want to count an assignment toward the final grade or not. This feature allows you to provide feedback for assignments without the assignment counting toward Gradebook calculations.
Learn more on how to exclude an assignment from the course's final grades >>
Yes. You can use a CSV file to upload changes to the Gradebook.
Learn more on how to export the scores from Gradebook >>
Learn more on how to import changes to Gradebook >>
The Total column in the Gradebook displays a running total of all graded assignments in the course, including assignments with hidden grades. By default, the total is hidden from the student’s view as sometimes it may not be reflecting the actual official course total grade.
Learn more about How do I use the Total column in the Gradebook? | How do I hide/show totals in my students' grade summaries?
Canvas provides onscreen analytics for both course level and individual students. The Course Analytics shows the overview of the course activity, assignment submissions, grades, and student performance. Student Analytics shows the overall performance of an individual student in the course. You can view analytics in both active and concluded courses.
How do I view Course Analytics in a course as an instructor? >>
How do I view Course Analytics for a student in a course? >>
6 | Communicating with your students in Canvas
Announcements allow you to communicate with your students about course activities and post interesting course-related topics. As soon as you have created an Announcement, Canvas will notify students through email according to their Notification Preferences.
Learn more about how to add an announcement >>
Learn more about announcements in general >>
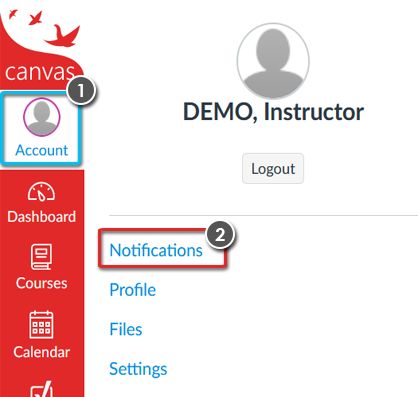
By default, Canvas does not send email notifications to the creator of an Announcement. To change this preference, go to your Account (1), then select Notifications (2). Update the setting for Announcement Created By You (3) to Notify immediately.
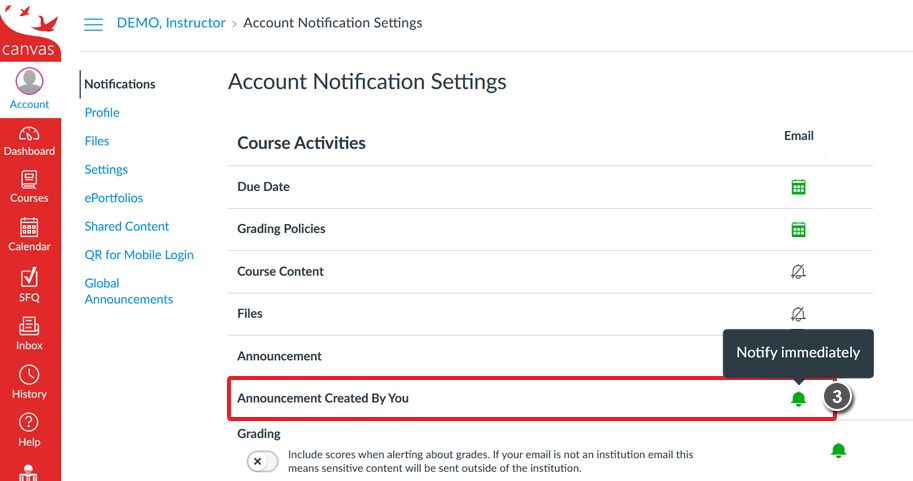
If you have already enabled this setting but are still not receiving email notifications, please check your Junk or Spam folder. Additionally, verify whether Push Notifications are enabled on your mobile device, as they may affect notification delivery.
Set the Available From date to a future time beyond the current date, then click Publish. This way, you and other course staff can view the announcement, but it will not be visible to students yet. When you are ready to release the announcement to students, simply edit the announcement, clear or update the Available From date to the desired release date and time, and Save the changes. The announcement will then be posted to students accordingly. Learn more about how to set the delay posting of an announcement >>
The Inbox is a messaging tool in Canvas. You can use it to communicate with your students easily. The Inbox tool is similar to email, but it does not have as many functions as a normal email (no cc options, no spell-check). Please note that you cannot send messages to users in concluded courses.
To access this tool, click the Inbox in the global navigation in Canvas. Learn more about how to send a message to a user in a course in the Inbox >>
If you want to get an instant email notification on your conversations with the students, make sure to change the setting for the ‘Conversations Created By Me’ notifications setting to Notify me right away. Follow the steps below.

The Calendar in Canvas provides a consolidated view of all your courses and groups, displaying assignments and events associated with each. By default, the calendar appears in Month view, but you can switch between Week, Month, or Agenda views to suit your preference. Additionally, you can easily reschedule items by dragging and dropping assignments from one date to another.
Learn more on how to use the Calendar >>
Learn more about how do I add an event to a course calendar>>
7 | More tools on Canvas built by HKUST
This tool consists of three parts, Student Photos & Lists, Discussion Data and Appointment Group Lists. Teachers and TAs can access it from the left menu on your Canvas course site.

Student Photos and Lists allow you to see all the students enrolled in your course with their photos, names, login IDs, student IDs, and section information. The list can also be filtered by section or group set [1]. The tool also allows you to export the lists as a spreadsheet (.csv) file or export the student list from Canvas directly into Qualtrics [2]. To ensure data privacy, the Student Photos & Lists tool is only available for teachers and TAs, but not to students. Student photos will not be included in the exported spreadsheet file.

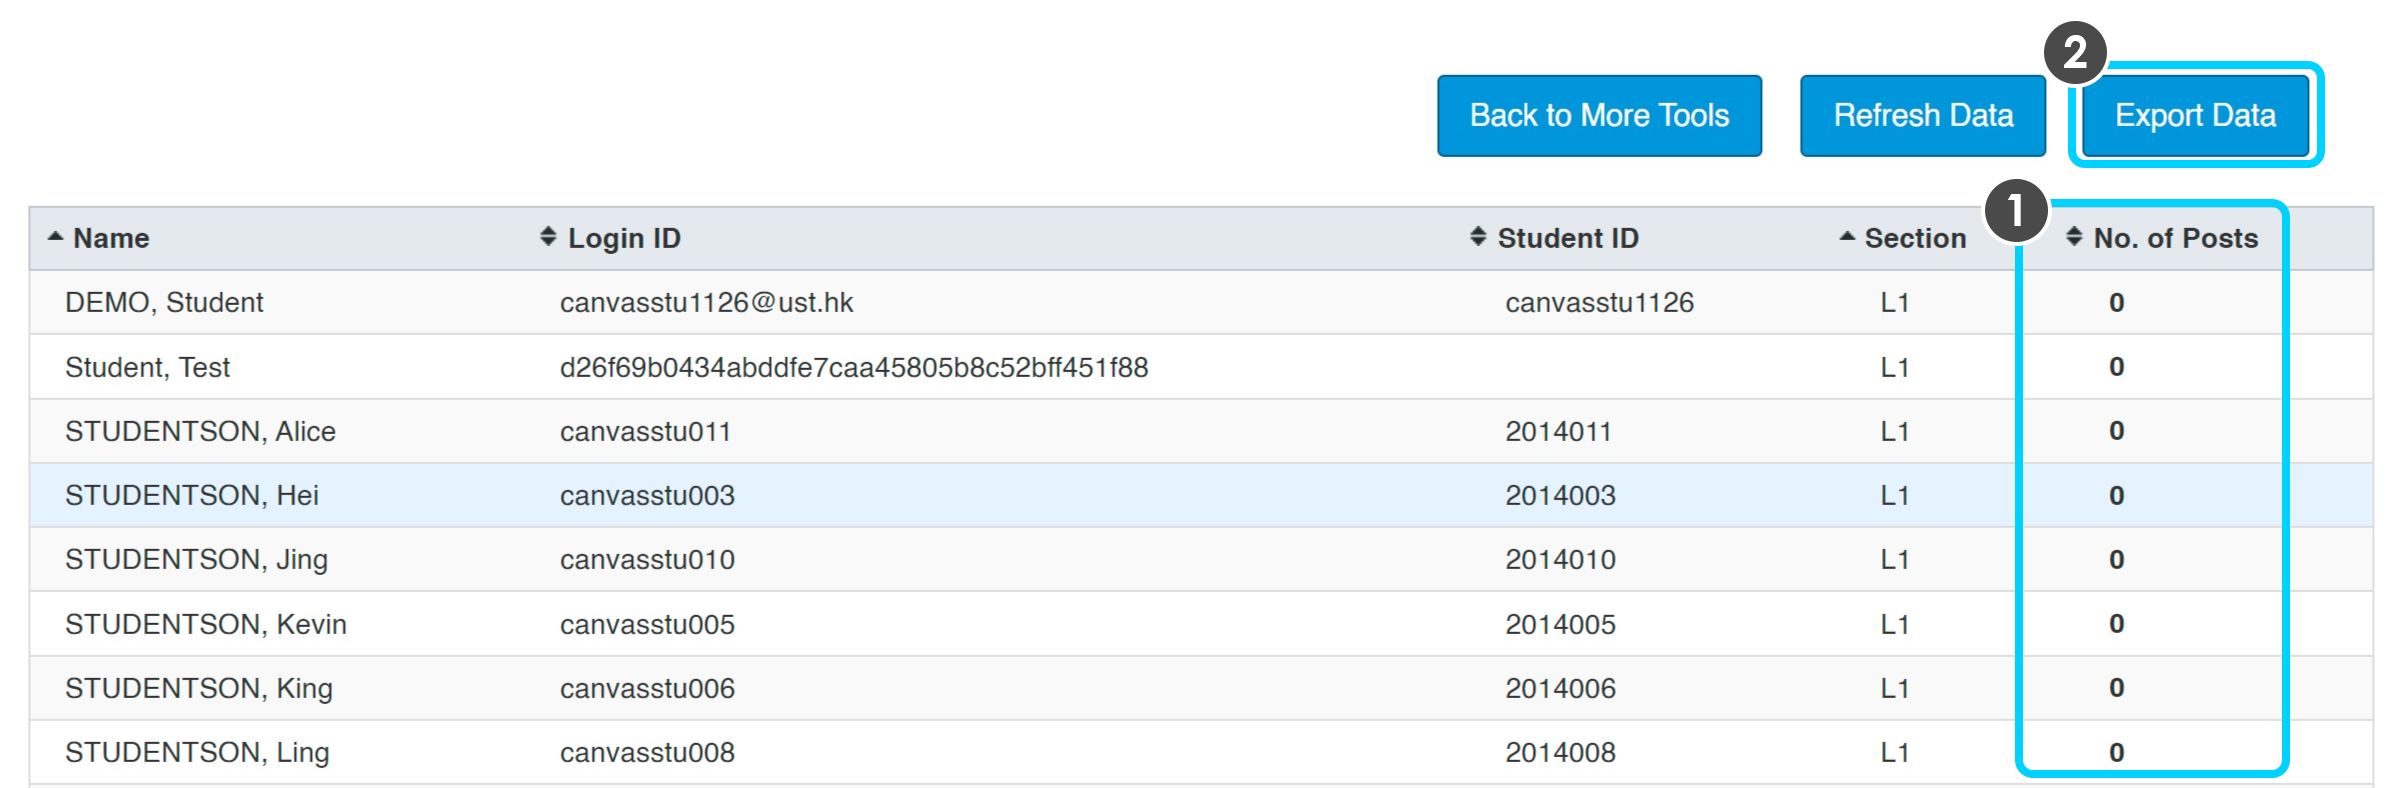
Discussion Data gives you an overview of students’ participation in the Discussions tool. It lists the total number of posts [1] made by each student. You may drill down the details of the posts of each student by clicking on the student. If you prefer to view the data offline, you may export it into a spreadsheet file [2].
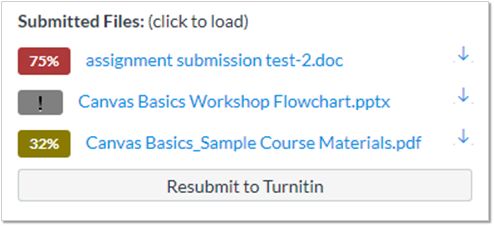
A certain amount of data will be gathered from the database before presenting on the screens, so it would take some time to load when More Tools, Student Photos and Lists, or Discussion Data is clicked. The loading time may vary depend on the class size and the total number of discussion posts. Loading progress will be shown in percentage for your reference (see sample image below).
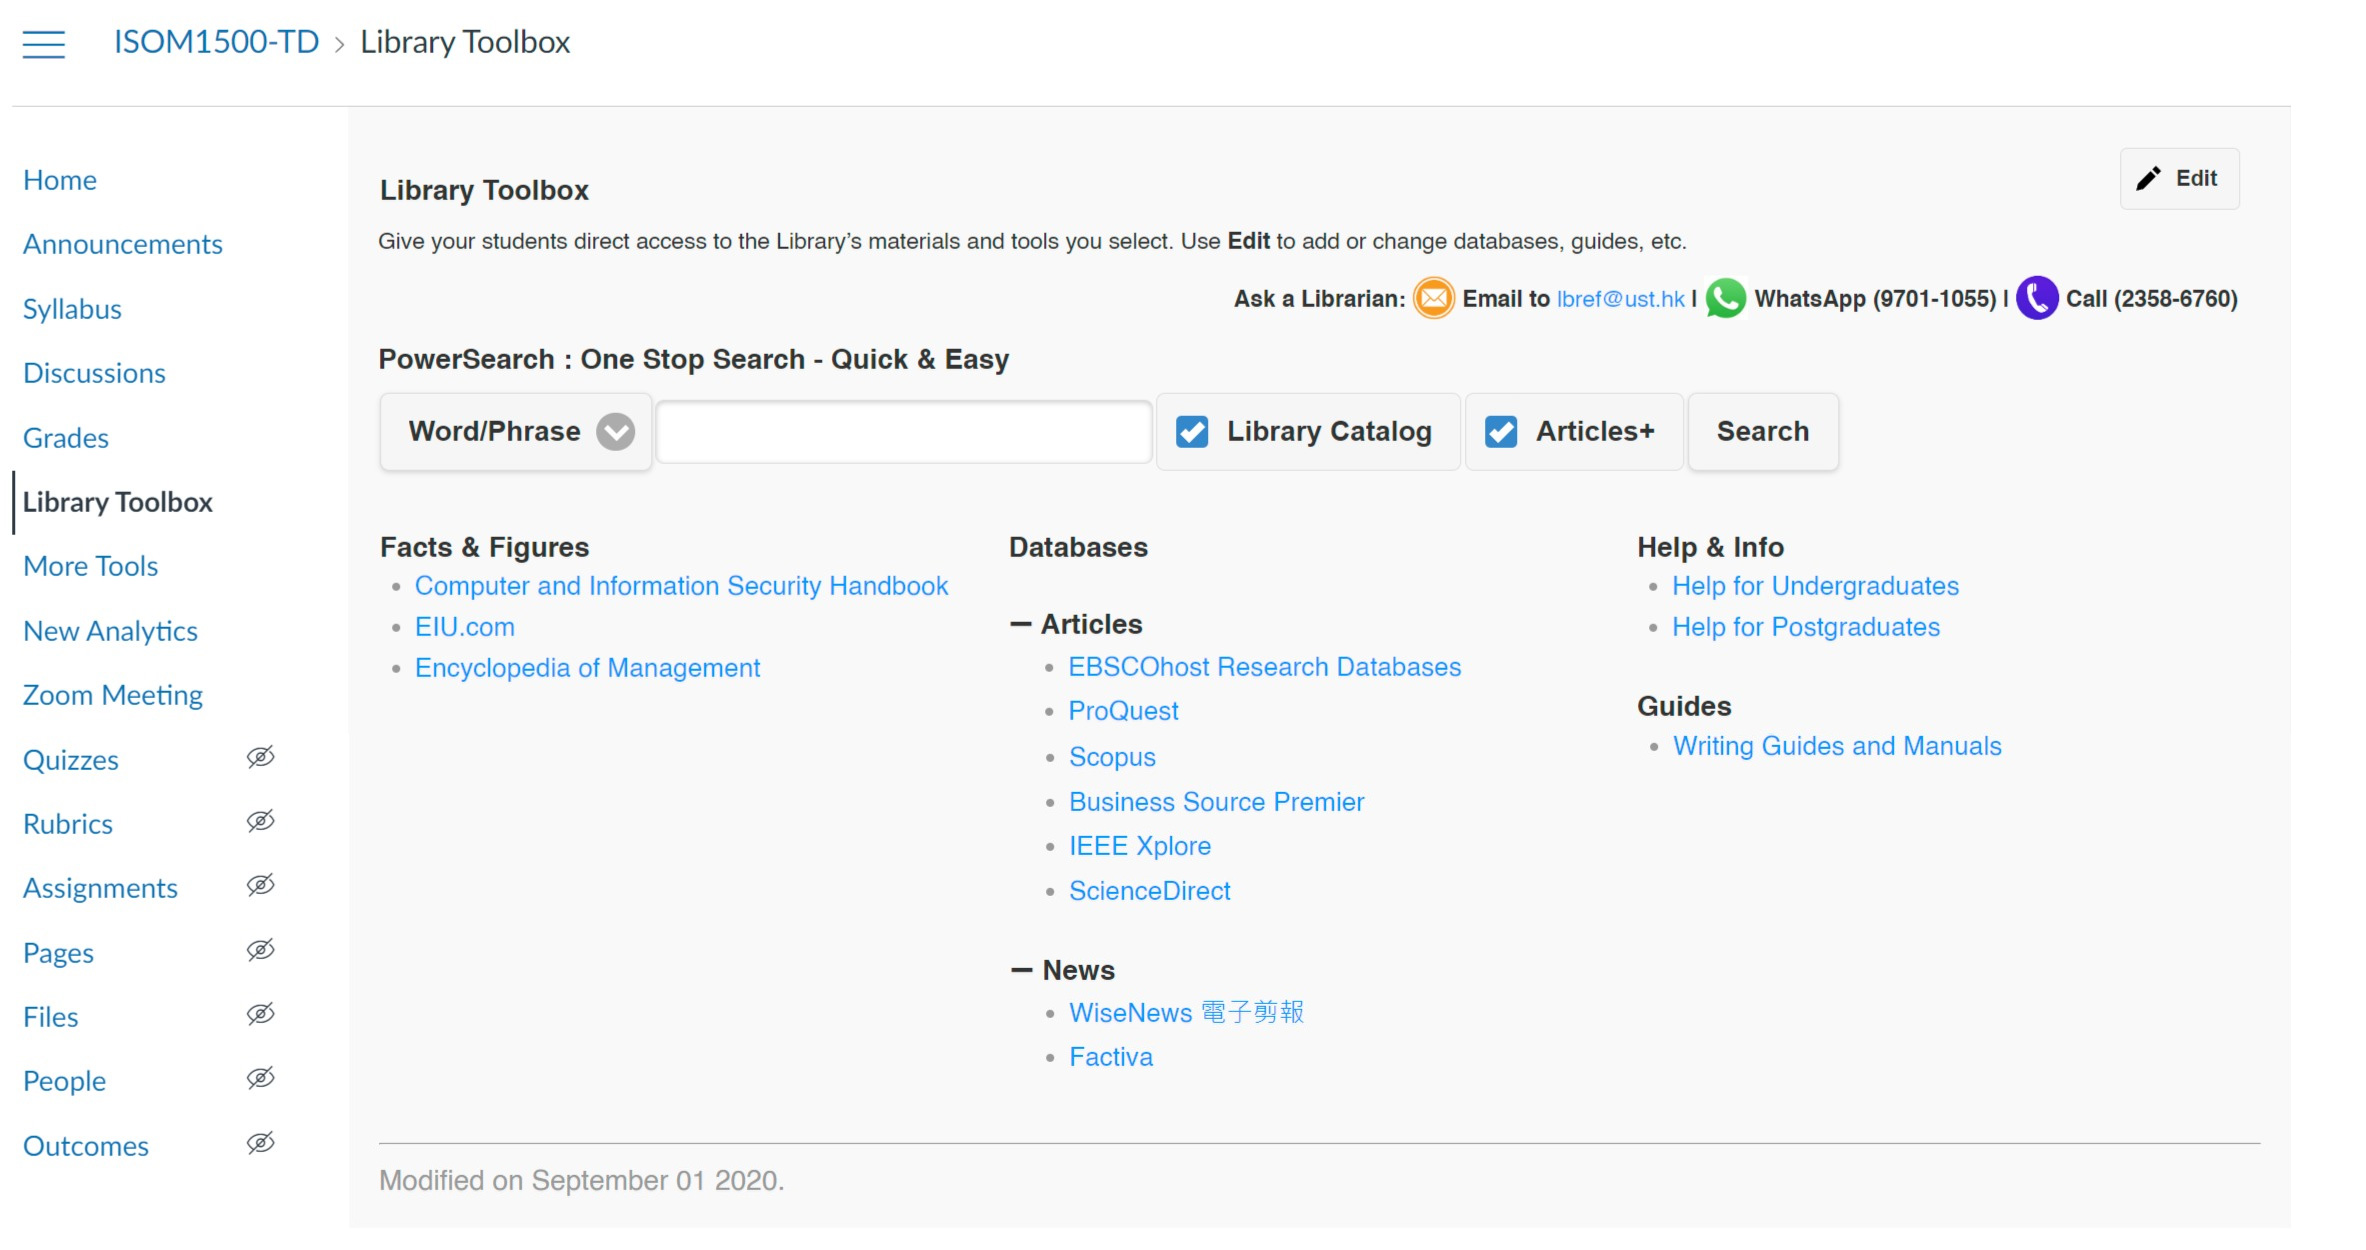
The Library Toolbox is an online tool that is jointly developed by the Library, ITSO and CEI and is integrated with Canvas. Instructors can easily customize the page linking to the library sources related to the course subject. It includes over 200 resources available to select from, which are divided into 5 main categories:
- Facts & Figures - include encyclopedias, dictionaries, handbooks, and databases with statistics or time-series data
- Databases - contain 3 subcategories, namely Articles, Books, and News. Databases that are not of these kinds, such as British Standards Online, Emerald Emerging Market Case Studies, and Naxos Music Library, if selected, are listed above the subcategories.
- Citation Managers - include 2 reference management tools: RefWorks (a library-subscribed database) and Zotero (a free online tool)
- Help & Info - include Course Reserve (if any), and useful help info for undergraduates and postgraduates.
- Guides - include some general education and subject guides that are popular and useful to most HKUST students.
For further enquiry about Library Toolbox, please visit https://libguides.hkust.edu.hk/friendly.php?s=library-toolbox, or contact the Librarian through email at lbref@ust.hk or WhatsApp (9701-1055).
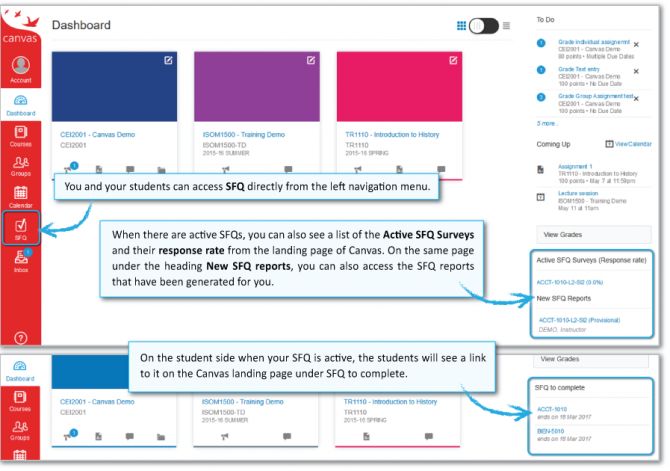
As the Instructors, you can access the HKUST SFQ through Canvas.
For further enquiry about SFQ, please contact sfq.survey@ust.hk or call their hotline at 2358-8916 during office hours.
8 | More help with Canvas
You can get more help with Canvas by using the Help link from the top right menu in Canvas. The Help link consist a list of resources to help you with Canvas as follows:
CEI offers all-season online self-paced courses about the fundamental skills and best practices of using Canvas. Learn more and enroll now >>
We recommend you also explore the video tutorials created by Canvas via their YouTube channel >>
If you could not locate your answer from this HKUST Instructor Guide, you may try look up the answer from the up-to-date Instructor guide with step-by-step instructions and snapshots maintained by Canvas. Go to the Online Canvas Instructor Guide >>
You can also always search for an answer about a Canvas feature from the Help link in the top right corner, Search the Canvas Guides. This link will take you to Canvas Guides, where you can search Canvas documentation for information about features inside of Canvas.
If you are experiencing problems that have not been addressed by the above-mentioned channels of help or if you have any user account related enquiries, please feel free to contact our Helpdesk at 📧 canvas@ust.hk or call our hotline ☎ 2358-8036 from 09:00 - 12:45 and 14:00 - 17:30, Mon - Fri.
Students will also see the Help menu directly through Canvas. You can also direct them to the Canvas Student Guide, which provides help with frequently asked questions. The link is accessible from the Help menu, or through the web version here.
Must be "Fair Dealing"
The Copyright Ordinance of Hong Kong allows instructors and students at non-profit education institutions like HKUST to use copyright works up to a "reasonable amount" for education purposes on the condition that such usage is considered fair dealing as provided in Section 41A of the Copyright Ordinance. The Fair Dealing tab of this guide provides more information.
Uploading content
When uploading the "reasonable amount" for the purposes of instruction onto an intranet (like Canvas) you must fulfil the following requirements.
- Acknowledge the source of the material properly;
- Adopt access controls, such as logins and passwords and disseminate material on a need-to-know basis (i.e. only accessible to a specific group of staff or students for a limited time); and
- Ensure that the maximum uploading period of the material does not exceed a consecutive period of 12 months.
E-Reserve or Coursepack
- Maybe there is no need for copying or uploading. Consider having the Library make links to material that the university has already purchased via library subscriptions. Or, you might want to need to license the material you wish to assign via a course pack.
- Read the E-Reserve & Coursepack tab for details.
Questions?
Please get in touch with HKUST's representative on the Joint University Librarians Advisory Committee (JULAC) Copyright Committee, Ms Victoria F. Caplan (Extn. 6756; lbcaplan@ust.hk) if you have further questions.
For more copyright-related information, please refer to the resources provided by the library.
By using the HKUST Learning Management System, Canvas, provided by Instructure Inc., users are agreeing to be bound by the terms and conditions. (see https://ilearn.ust.hk/canvas/canvas-user-agreement/index.html).
By using Canvas, your use of Canvas is also governed by Instructure’s Terms of Use (see https://www.instructure.com/policies/terms-of-use) and you are also consenting to the collection and use of information by Instructure according to their Privacy Policy (see https://www.canvaslms.com/policies/privacy).