- Click the categories below to jump to the relevant section.
- Click on each of the questions below to expand for more details.
-
You may also search using 'keywords' for better results. If your keyword is found, search results will show in the question and answer.
Type in keywords, e.g.: whiteboard, ipad, or F2F
Pedagogy Related
A2: We recommend grouping F2F students with F2F students and online students with online students. If grouping students from both sides is unavoidable, F2F students should discuss with online students in Zoom's breakout room with their headsets on. They should also mute the microphone when they are in the main room, otherwise there will be serious audio feedback and echo during class. Please see the next question, Q3.
A3: There will be serious audio feedback and echo when F2F students join Zoom with their microphones unmuted and/or not using headsets. It happens in most classrooms, and such disturbance will also affect online students.
As F2F students cannot speak up flexibly through their microphones due to the audio feedback, interactive/breakout activities cannot be conducted in Zoom easily. To avoid this kind of technical hiccup, we do not suggest having F2F students joining Zoom in the classroom if you plan to have interactive activities in the class.
Alternatively, the issue can be resolved by asking ALL F2F students to join Zoom with headsets and mute their microphones throughout. When F2F students would like to speak up, instructors can either circulate Mic4Me or activate the ceiling mic, so that online students can also hear clearly.
More info on Audio Feedback: https://support.zoom.us/hc/en-us/articles/202050538-Audio-Echo-In-A-Meeting
A4: As students will turn up F2F or in Zoom week by week, it is hard for you to pre-assign students into groups. The collaboration is also challenging for student groups when mixing some members in the classroom and some online. Therefore, random grouping is a more flexible approach in Mixed Mode teaching.
If pre-assigning students into groups is unavoidable, we suggest instructors either schedule some sessions for student groups to work online or ask student groups to sign up every week with the whole group committed to either join F2F or online.
A5: For Mixed Mode teaching, we recommend using iPRS or Mentimeter instead of Polling in Zoom.
A6: In Mixed Mode teaching, apart from leaving messages in Chat, online students can speak up in Zoom. Questions will be piped through the classroom speakers and to be handled by the instructor in real time.
If you adopt Mixed Mode Lite, chat questions can be handled by the TA in real time, and you can also back up the chat messages and address the questions afterwards.
Teaching Support (TAs)
A1: You should communicate with your TA about your teaching plan each week. Then, convey to your TAs your expectation clearly, so that they know how to best support you. Conducting dry-runs and having more frequent meetings with TAs throughout the semester would definitely help your TAs understand your needs.
To understand more about the role of instructor and TA in Mixed Mode, refer to the sample teaching plan.
A2: If the TA is going to stay with you in the same room, the TA should be muted in Zoom to avoid audio feedback and echo. They should mainly use chat to address online students' inquiries.
More info on Audio Feedback: https://support.zoom.us/hc/en-us/articles/202050538-Audio-Echo-In-A-Meeting
A3: Yes. The TA should have a separate laptop in Mixed Mode teaching. Some TA tasks include answering questions from online students, create breakout rooms, provide technical support, post instructions online, and other administrative tasks to assist the instructor during the session.
Technical Support Related
A1:
You can refer to our resources page on Getting Started with Mixed Mode
- Mic4Me system for capturing the instructor's audio into Zoom,
- Ceiling mic for capturing F2F students' audio into Zoom,
- Visualizer for projecting written work or simple demonstration through Zoom, and
- RVC feed for showing the wide classroom environment to Zoom
To teach with your laptop, start the Zoom Meeting with the classroom PC first and join the Zoom Meeting with your laptop as co-host.
Although you can sign into both your laptop and the classroom PC with your HKUST account concurrently, you are recommended to apply for a project account for your laptop to ensure all Zoom features are fully functional. You can apply for the HKUST project account here, it will be available to you one day after the application.
The classroom PC should show your laptop screen through the Zoom window, F2F students can then view it through the projectors. Meanwhile, teach with the Mic4Me/Ceiling mic, which are connected to the classroom PC.
To avoid terrible audio feedback, you should mute both the speaker and the microphone of your laptop while teaching.
You are recommended to perform a dry run in the classroom, especially to test the capability of piping the audio/video input to online students through Zoom.
A4: You may consider projecting your hand-written workings through the visualizer or you can request for RVC feed from MTPC to capture the classroom whiteboard. MTPC's operator controls the RVC camera to follow the instructor and writing on the whiteboard. You may also use the Zoom Whiteboard shared to online students and projected on the screen for F2F students.
Please see the next question, Q5 if you want to use an iPad.
A5: To annotate teaching materials with the iPad, start the Zoom Meeting with the classroom PC first and join the Zoom Meeting with the iPad as co-host.
Although you can sign into both the iPad and the classroom PC with your HKUST account concurrently, you are recommended to apply for a project account for the iPad to ensure all Zoom features are fully functional. You can apply for the HKUST project account here, it will be available to you one day after the application.
Here are the steps to set up the iPad for the Zoom Meeting:
- Start the Zoom Meeting using the classroom PC
- Open the Zoom app in your iPad, join the meeting with the project account
- Do not join audio in your iPad to avoid terrible feedback noise

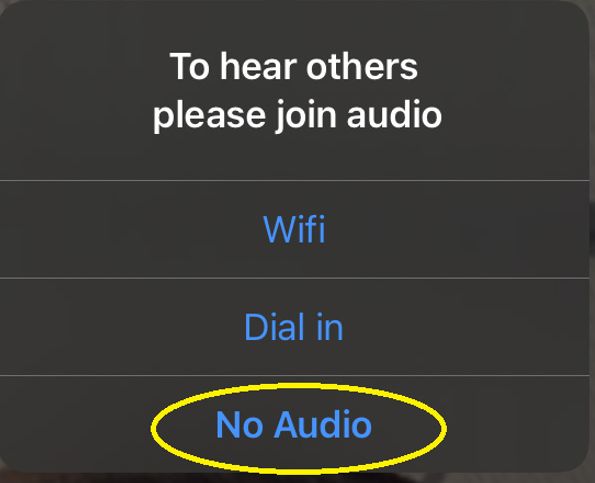
In Zoom, select "No Audio" when prompting to join audio

The "Join Audio" icon should appear, indicating the iPad does not join audio

If the iPad joined the audio, tap "More", and select "Disconnect Audio"
- In the classroom PC, assign the iPad as the co-host
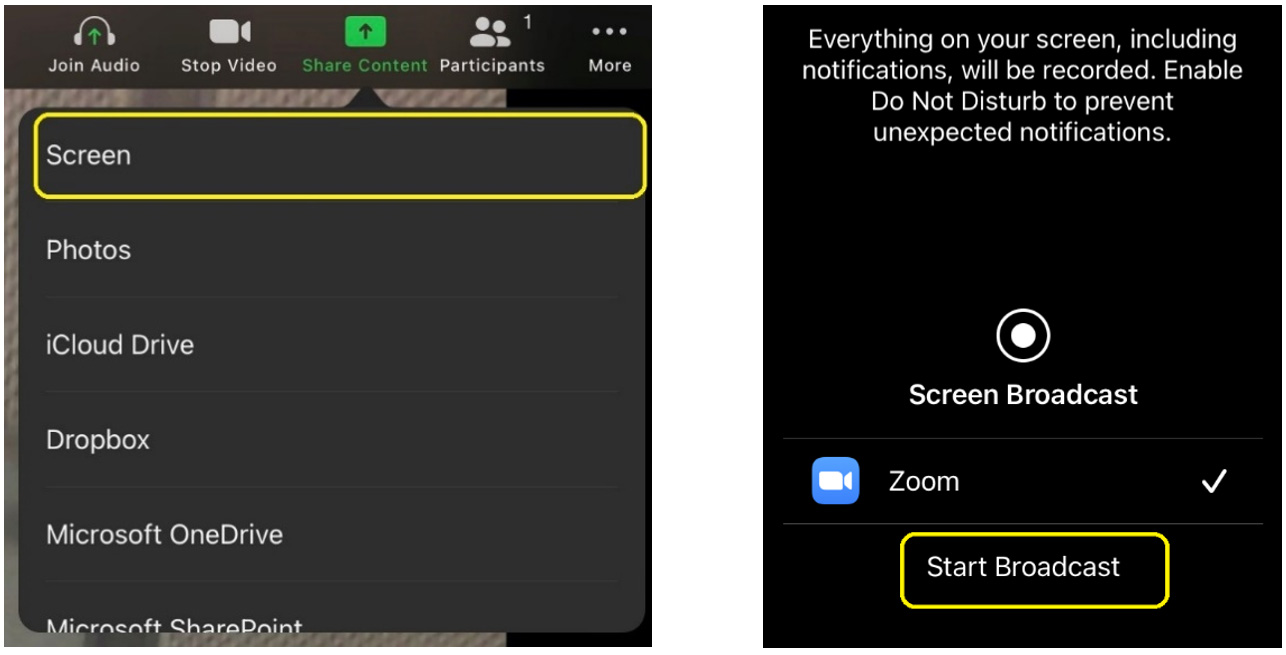
- In the iPad, tap 'Share content', 'Screen' and select 'Start broadcast'

- Switch to the app with your teaching materials in the iPad
The classroom PC should show the iPad screen through the Zoom window, F2F students can then view it through the projectors. Meanwhile, teach with the Mic4Me/Ceiling mic, which are connected to the classroom PC.
In case of switching the video (i.e. your talking head), you can switch between the webcam of the classroom PC and the iPad front camera using the "Spotlight video" feature in Zoom.
We recommend using iPad Pro with Apple Pen to get the accuracy and smoothness for teaching, especially for mathematics, chemical formulae, etc.
For classrooms without ceiling mic, you may capture F2F students' audio through an extra Mic4Me device. As the Mic4Me supply is very limited, we recommend instructors only borrow extra Mic4Me for conducting interactive activities, such as in-class discussion and student presentations.
A7: Not all projected screens can be captured clearly through RVC at the same time. Please specify your requirements when you requesting for RVC feed service from MTPC. To effectively project your writing to online and F2F students, we recommend using the visualizer in the classroom.
- Choose Webcam to show talking head when teaching in front of the podium
- Choose RVC Feed to show the wide classroom environment when instructor is walking around or using the whiteboard. Note: Please book RVC Feed through MTPC


